Contact
![]()
About
Union is developed and supported by Intellicess, Inc. Intellicess was founded in Austin, TX, to commercialize technology spun out of the University of Texas which was initially developed for nuclear submarines. Today, Intellicess creates pioneering products and supporting services for the oil and gas industry to solve our customers’ problems, tailored to their unique environments. With multiple clients utilizing numerous rigs, both land and offshore, and having been utilized on over 1,200 wells and counting, Intellicess has a proven track record of results with a customer-centric approach. Today, Intellicess provides two flagship solutions: SentinelRT® and RigDAP™, and Union® which is our latest solution offering.
Get in Touch
Please use the contact form available on our company website.
FAQ
![]()
GENERAL
1. What is Union?
Union is a pipeline to simplify and automate the transfer of diverse “pieces” of data, as they become available, between companies working together on a project, in a secure manner with minimal infrastructural investment requirements.
2. How will Union help save time and money?
While WITSML has successfully automated the process of transferring real-time data from the rig site to the office over the more than 30 years of its existence, it has unfortunately failed to be an effective solution in transferring all other data. Ultimately the cost of the well is borne by the operator and having all data in one place as soon as they become available, can help find inefficiencies, and save time and money.
3. What are some example uses of Union?
- Operators can have their data electronically transferred by the service providers directly to their data lake. Minimizing human involvement, re-typing of data, and ultimately cost.
- For the service providers who are not yet ready to invest in WITSML infrastructure, they can offer an electronic data transfer service to the Operator and gain a competitive edge (over others who still send pdf files and excel sheets through emails).
- Operators can share contextual data/well plan with their service providers – in an automated way – for real-time improved operational efficiency.
4. Aren’t emails a good pipeline?
Emails are the current standard way by which pieces of information, other than real-time sensor data get shared between collaborating companies. However, data that get transferred through email, must be manually retyped into analysis software for real-time benefits. Additionally, data that gets transferred through email gets lost over time. Also, the formats used for the data files transferred through email, whether it is Las, CSV, or pdf cannot be easily stored in a database.
5. Is WITSML not a good pipeline for transfer of data?
WITSML has served the industry well for over 30 years now. However, it has failed to be able to be an effective means to transfer data not collected by the electronic data recorders (EDRs). This can be primarily chalked down to one reason. Setting up a WITSML server is expensive and time consuming, and that is unlikely to change in the future. This makes it economically infeasible for small, but vital pieces of data to be made available in an electronically usable form for improving well construction efficiency and automation.
6. Can data quality be monitored?
Yes. We understand that data quality is important. We can also understand that every dataset will have its own unique properties that call for a customized way of monitoring for data quality. Union is architected such that a third-party data quality monitors can easily connect to the pipeline to provide such services.
We are excited by the work currently ongoing by the OSDU forum. OSDU is working towards standardizing the naming convention for commonly used data. That same standard will work with Union as well.
8. Can Union only be used for drilling/well construction data transfer?
No, it can be used to transfer any type of data generated in the oil and gas or geothermal sector.
9. Is Union vendor neutral?
Absolutely. The more the industry shares data, the better for the industry. We are happy to facilitate data share through Union.
10. How about data security?
In Union, data at rest is encrypted and all public network traffic uses Transport Layer Security (TLS) protocol. For access restriction, OAuth2 authorization protocol is used. Union is a SaaS solution. Therefore, you get the security already implemented in Azure. Learn about Azure’s SOC2 compliance offering here.
Union uses NoSQL document database. Its architecture fits the Json Well Log Format perfectly. Thanks to that, data operations are much faster than in systems built upon relational databases.
12. How long is data stored in the cloud?
By default, data is only kept for 12 hours before being deleted. This can however be customized.
13. Who pays for Union?
Typically, it is expected that data consumer will pay for the data transfer. It will ultimately be dependent on the specific arrangement between the producer and the consumer.
14. How much does Union cost to use?
Union is currently a Beta release. So, it is free to use and trial right now. Bug reports and feature enhancement are much appreciated during this period. Post launch, the pricing will set based on usage (primarily a function of the amount of data transferred, the number of queries, and whether it is a real-time subscription). Union will always be free up to a certain usage level.
15. All this is interesting. How do I get trialing and using Union?
You can try Union out yourself to see if it fits your needs. To get started by yourself go here. We are also happy to demo the product to you. Please find contact information here.
TECHNICAL
We have adopted the Json Well Log Format (JWLF) as the primary data format for this platform. This format was first officially published by Petroware. We greatly appreciate their initiative. Please visit this site to learn more.
2. Can Union be used to transfer real-time data?
Yes. Union is an alternative to having to deal with WITSML, with a host of added advantages that can possibly never be provided by WITSML. While it builds on top of an open-source data format, it is not restricted to only that format, or a specific type of dataset. Explore some of the code in this repository to see how data can be moved around and processed in real-time. Note that you will need to create an account using the procedure at the Get Started page to run this real-time example.
3. Can I transfer photos captured at the rig site using Union?
Yes. Please check out our GitHub repository for examples such as those – demonstrating the transfer of drill bit photos. Note that Union can also be used to transfer data in any format using its “General Data” endpoints.
4. Where can I find API documentation?
You can find Union’s REST API documentation with all available endpoints here.
5. What identity and access management system does Union use?
Union uses Keycloak which is an open-source identity and access management system. This allows us to provide all the functionalities built and maintained by Keycloak. Please visit the Keycloak website to learn more.
Get Started
![]()
Guide Overview
The purpose of this guide is to give you a flavor of how easy it is to create a pipeline to enable data sharing between companies. The first section walks you through the process of creating the user accounts needed to be able to transfer data. In the second section, we will use Postman to demonstrate how the authentication and data transfer works. Finally, we will provide a short tutorial (Python) to demonstrate how all this works. The GitHub repository contains code examples in Java and C# as well, for easy integration into your software applications. Someone with very little experience in programming should be able to complete the whole tutorial in no more than 60 minutes. If you have any trouble following this tutorial, please contact us, and we will be happy to walk you through it.
Account Creation
The purpose of this section of the guide is to outline administration and user account creation, as well as role creation which are important steps in setting up the reading and writing functionality in Union.
Admin account creation
Using Union requires an admin account. That account allows you to manage your organization’s users as well as their permissions.
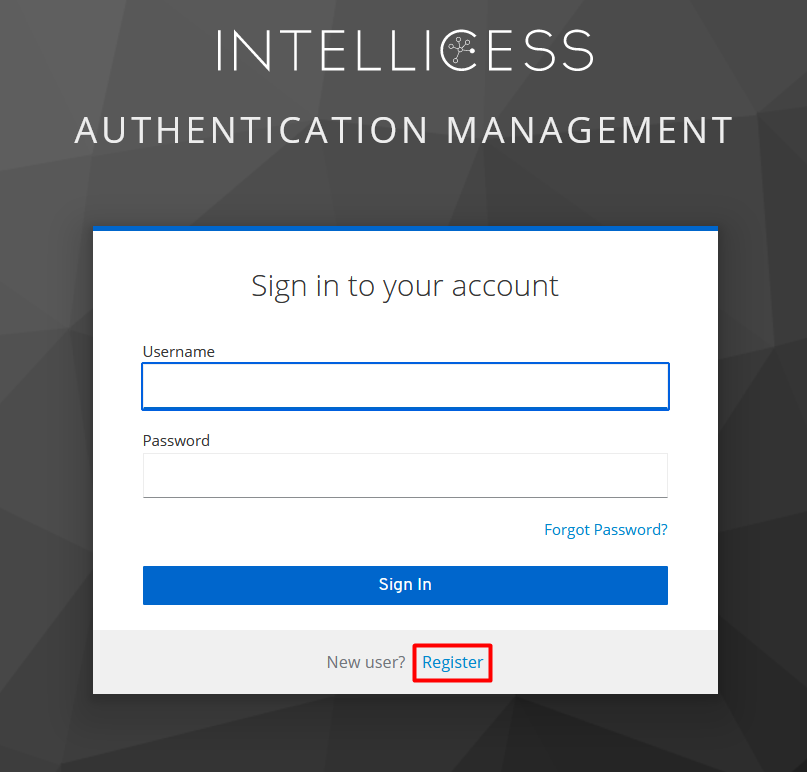
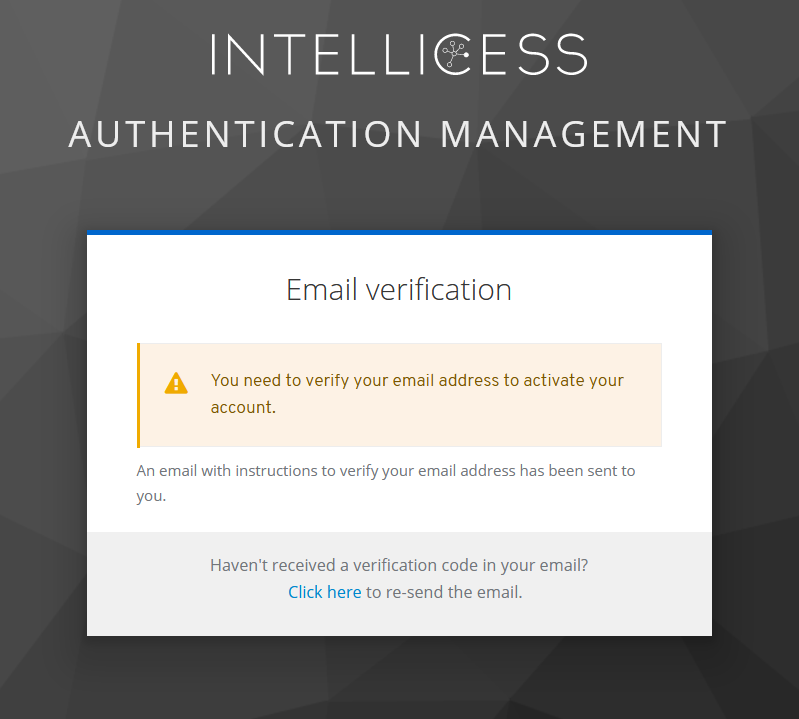
To create an admin account, go to Administration Console and click the Register button. Then, follow the registration process that will include email verification (if you don’t get an email, please check your spam folder). See below figures:
Once this is completed, log into the Administration Console, and it should take you to the public-test realm. This realm is made publicly available for test purposes. If you want to get a private realm for your organization, please go to the contact us section and write to us.
User account creation
As administrator, you have the authority to dictate the entities (persons) and their permission to share data. To demonstrate this, we will next create two user accounts.
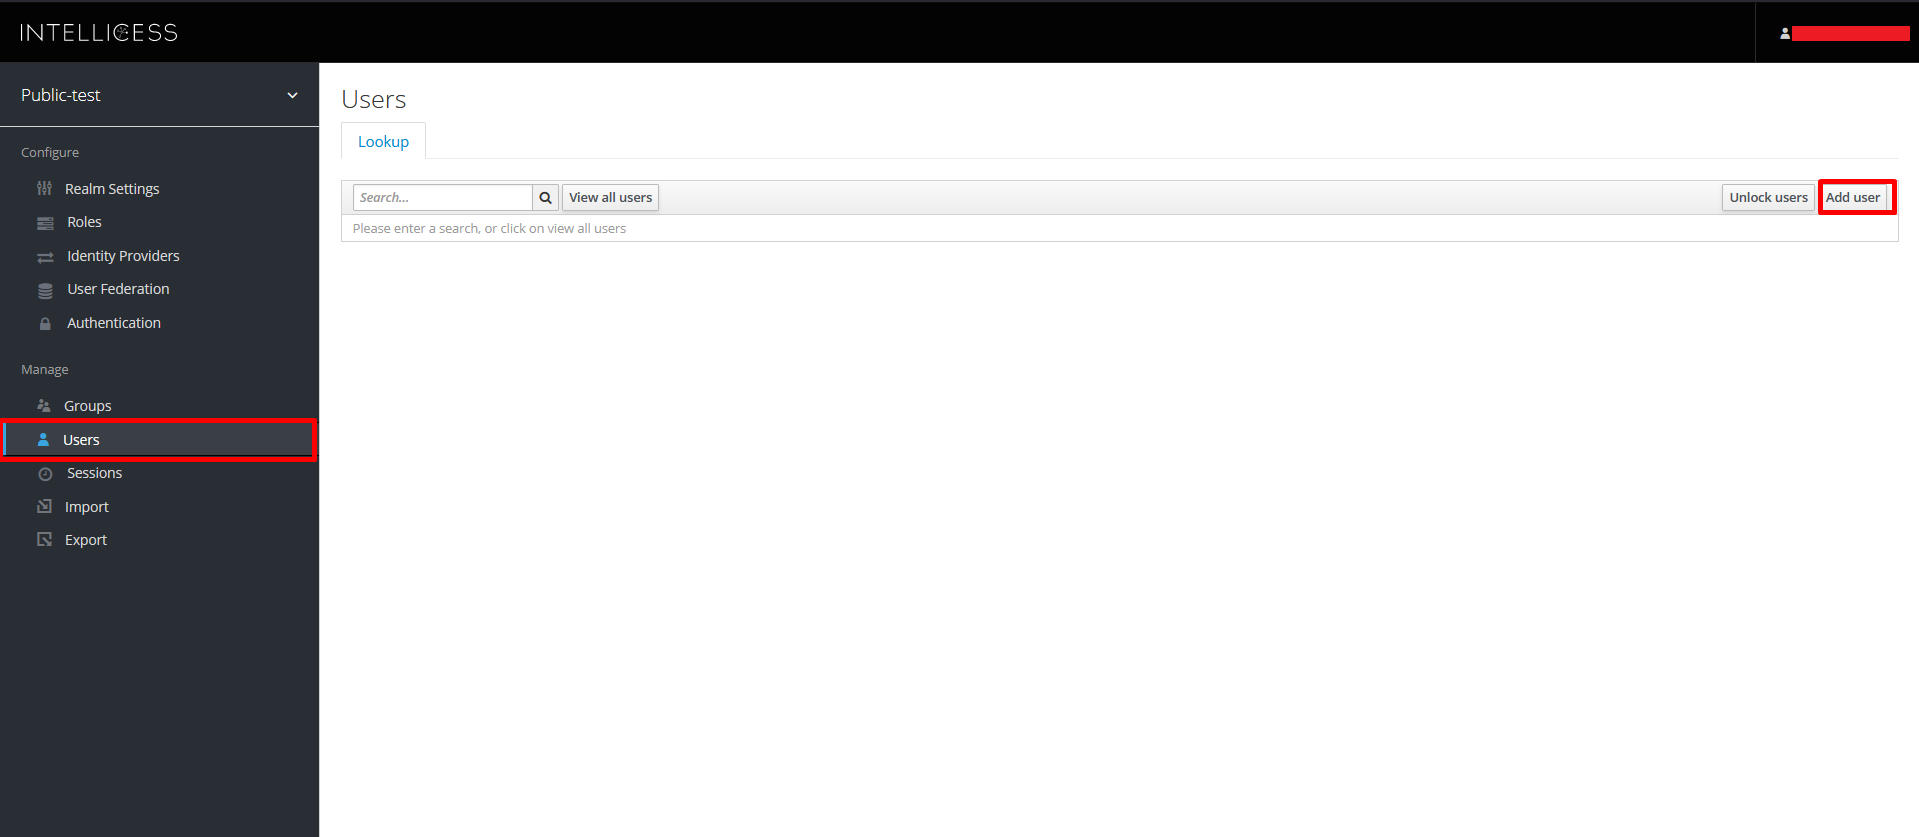
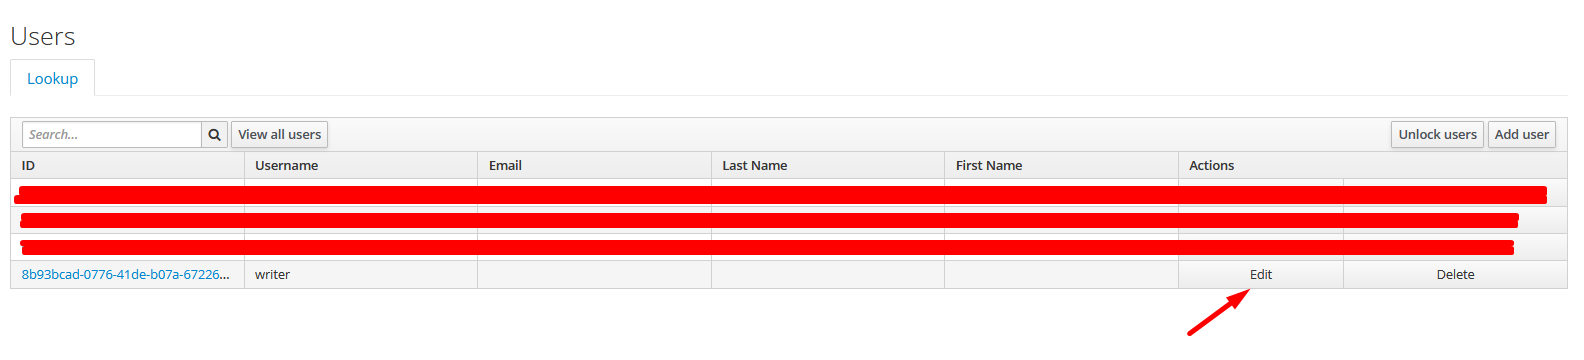
In the Administration Console navigate to the Users section. Then, click on the Add user button that is in the upper right corner.
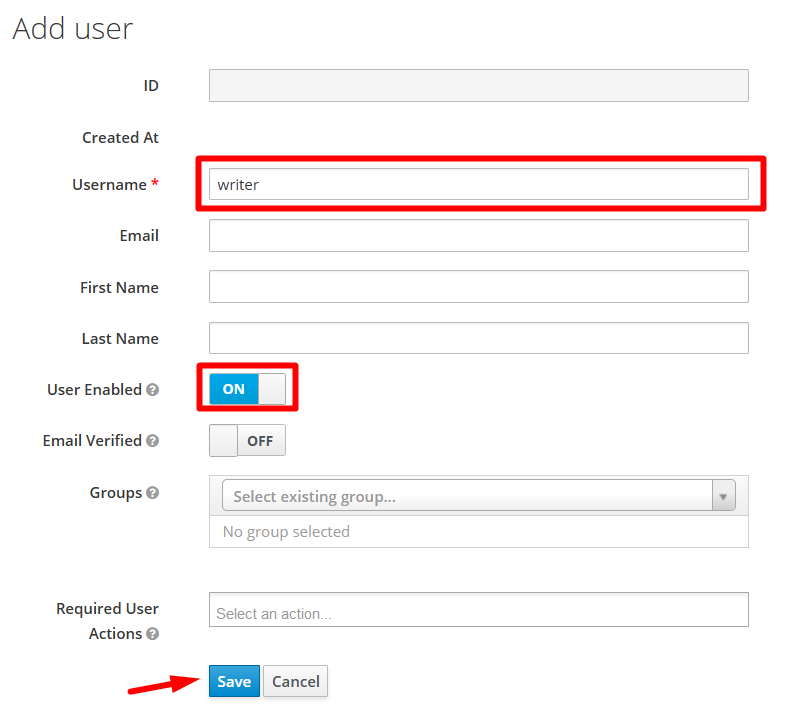
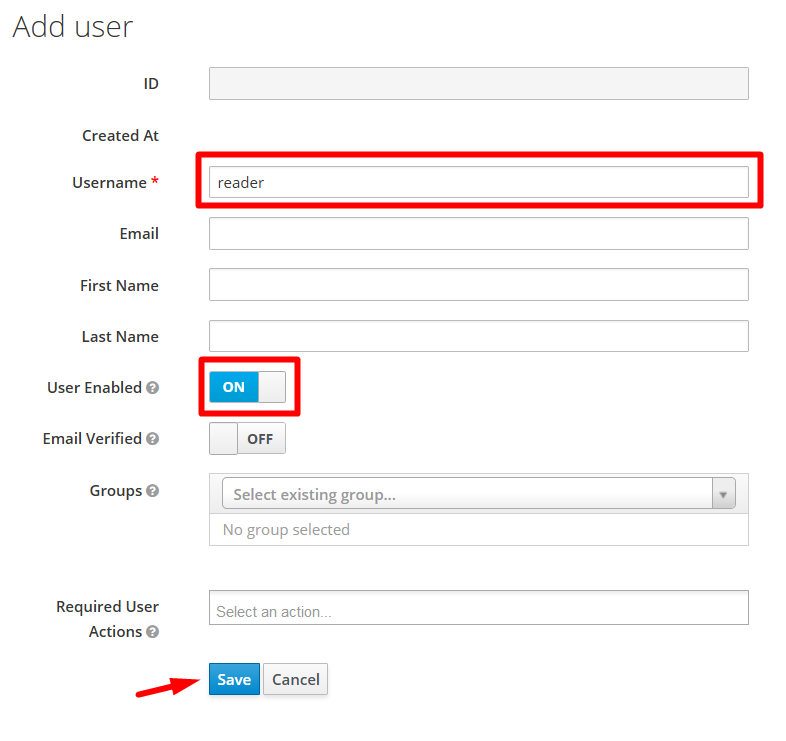
The following user creation form pops up. Fill in the username and check the User Enabled checkbox. Once this is done, you can click on the Save button. Note: Since this is a public-test realm, a user named “writer” may already exist. Create a unique username.
Click on the “Users” link in the left window. Then click on “View all users”.
In the next step you need to update the newly created user’s password. To do that, click on Edit button in the user’s row in Users section.
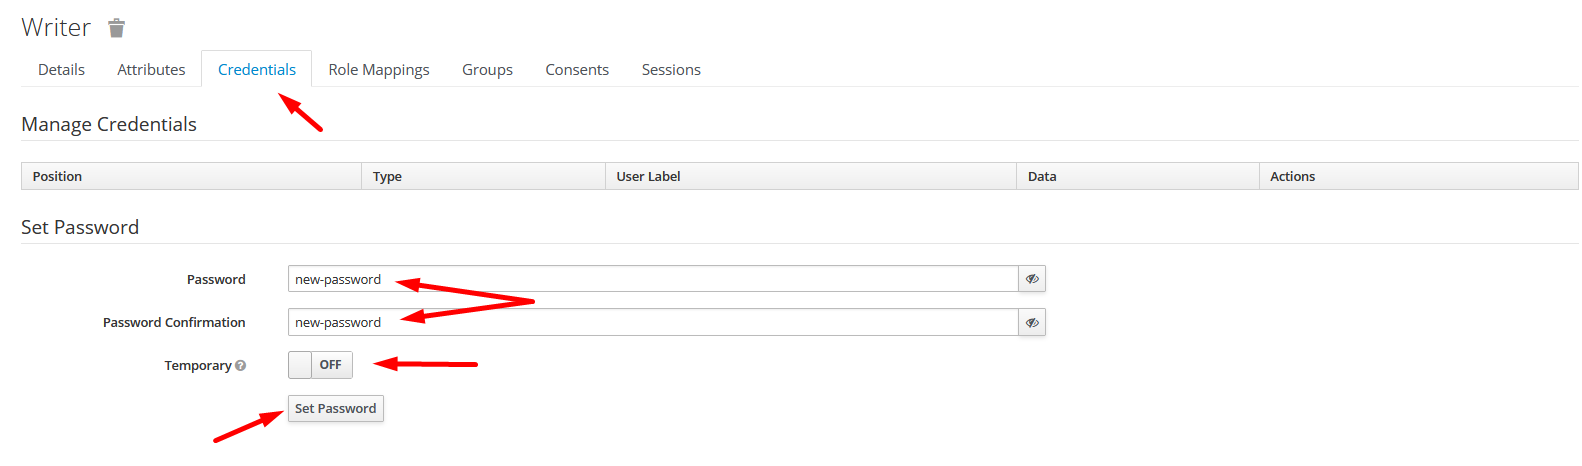
Then go to the Credentials tab and fill in Password and Password Confirmation fields. Also, uncheck Temporary checkbox and then click on Set Password.
Repeat the above steps to create a reader user.
We have thus created 2 user accounts - writer and reader.
Role creation/assignment
Now, to test data sharing between these two users, you need to give them access to the same data space. This is done using roles.
Roles must be created with a name that reflects the access you want to give to the user. The following name template is required:
«region»/«asset»/«folder»/*«"read" or “write” or “delete” or leave it empty which means access to all operations»
- region is the place the asset belongs to. It can be for e.g., a state or a town.
- asset is a general term. It can be for e.g., a well.
- folder separates the asset data in groups.
Below are some examples of roles:
- alaska/well3/data/* - access to all operations in folder ‘data’ for asset ‘well3’ in region ‘alaska’ in the current organization (identified by realm)
- texas/well121/*read - access to read operation in all folders for asset ‘well121’ in region ‘texas’ in the current organization (identified by realm)
- texas/*delete - access to delete operation in all folders for all assets in region ‘texas’ in the current organization (identified by realm)
- *read - access to read operation in all folders for all assets in all regions in the current organization (identified by realm)
- * - access to all operations in all folders for all assets in all regions in the current organization (identified by realm)
- texas/well1/shared-data/*write - access to write operation in folder ‘shared-data’ for asset ‘well1’ in region ‘texas’ in the current organization (identified by realm)
- texas/well1/shared-data/*read - access to read operation in folder ‘shared-data’ for asset ‘well1’ in region ‘texas’ in the current organization (identified by realm)
For our test example, we’ll create the last 2 roles in the above list - texas/well1/shared-data/*write and texas/well1/shared-data/*read, and assign them to the users. One will be able to write to the folder, and the other will be able to read from the folder.
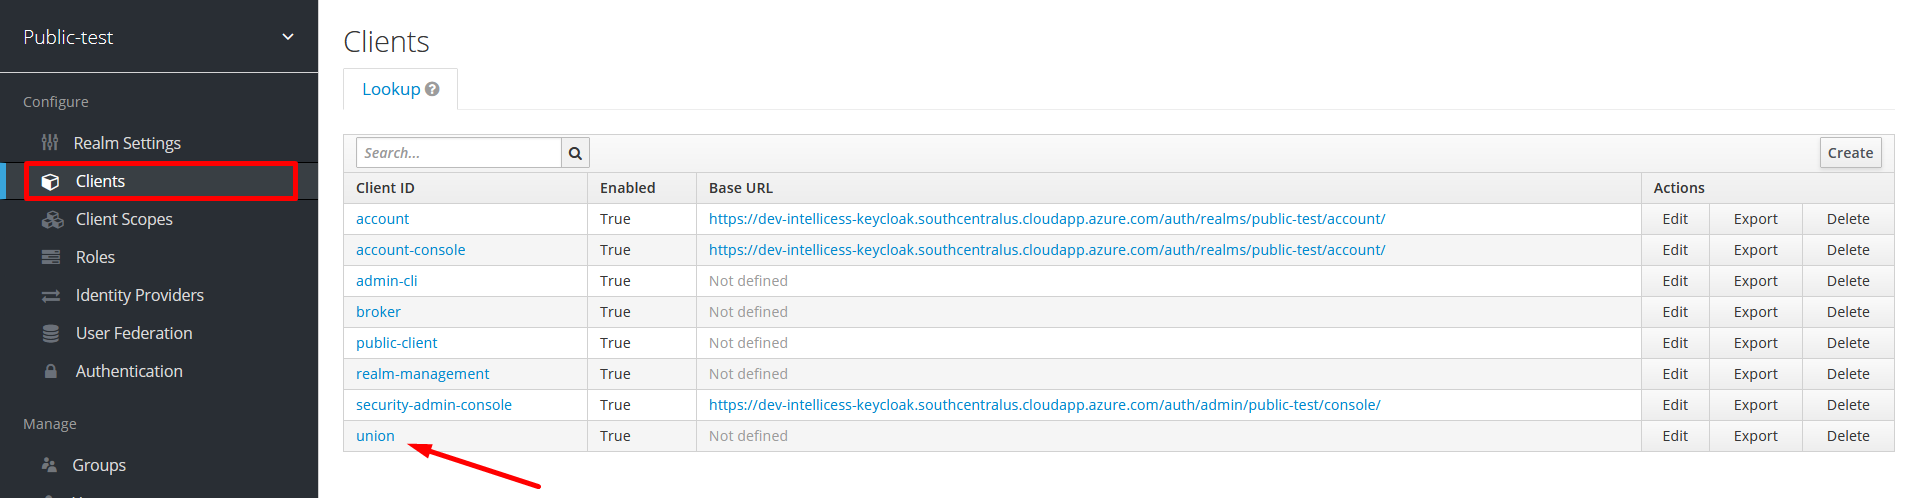
First, go to the Clients section. Then choose union.
Next, move to Roles tab and click the Add Role button in upper right corner.
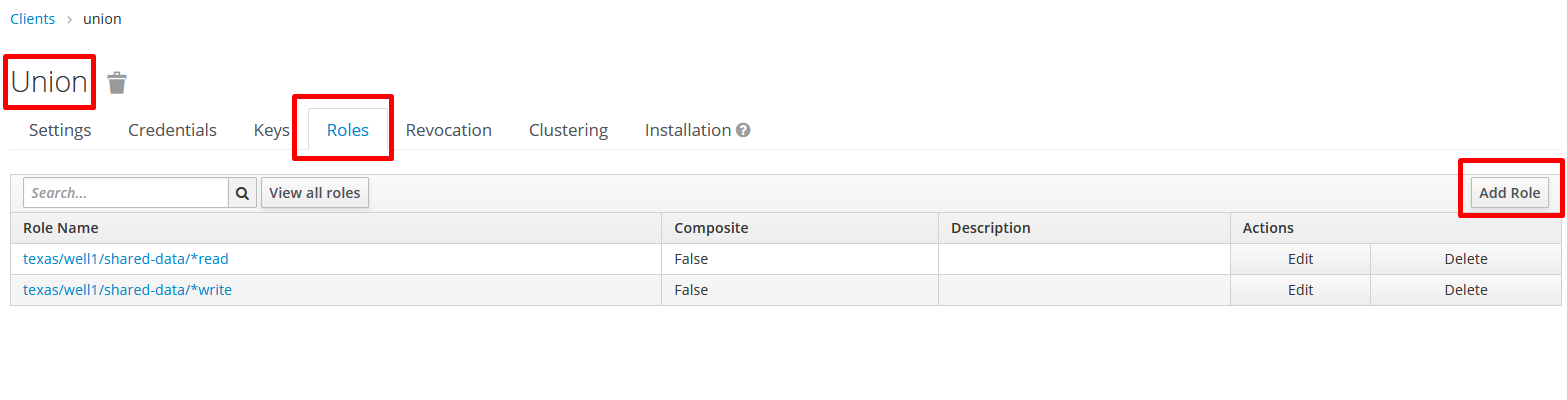
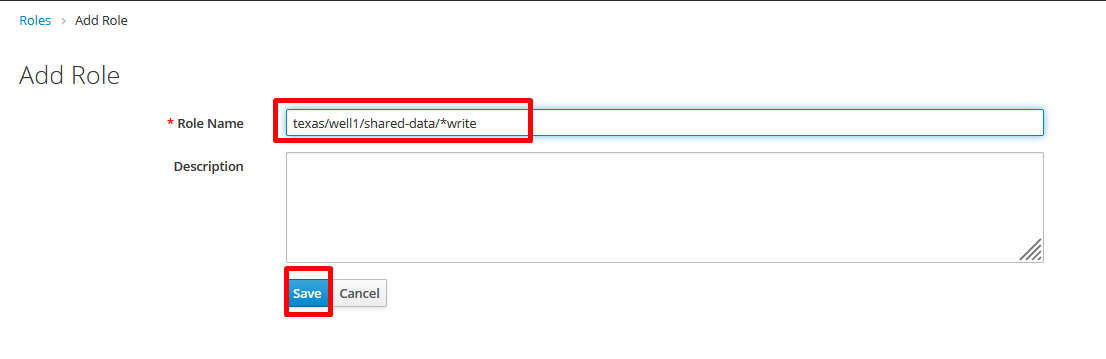
Set Role Name to texas/well1/shared-data/*write in the role creation form and click Save. This role will be assigned to the writer user.
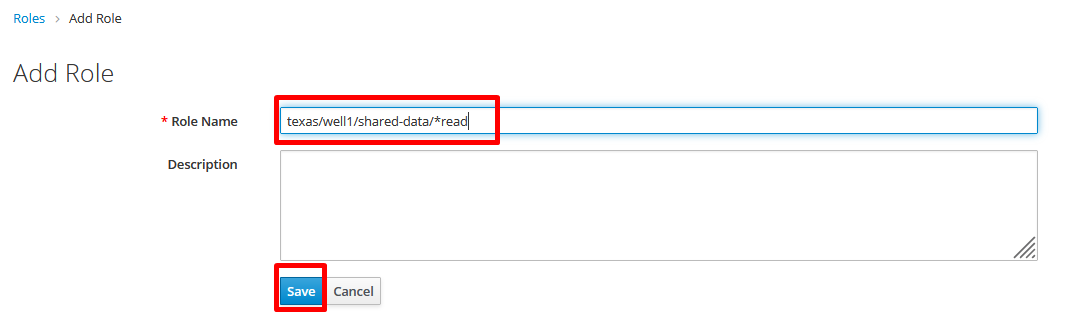
Open the role creation form again, and this time create a role for the reader user - texas/well1/shared-data/*read.
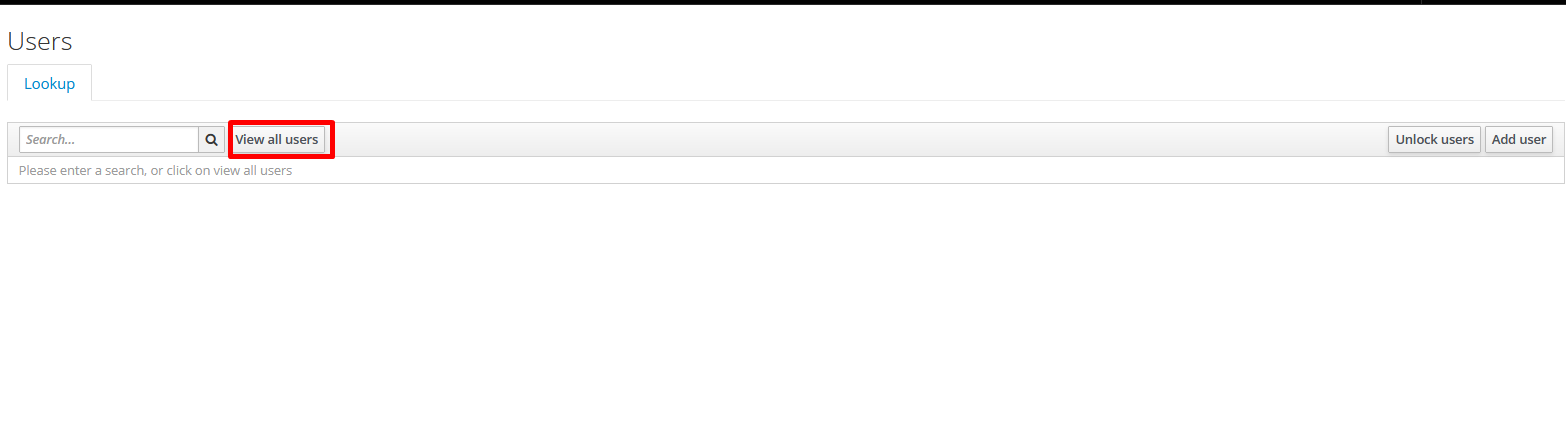
Now, go to the Users section and click the View all users button.
Then, edit the writer user you created by clicking the Edit button in the user’s row.

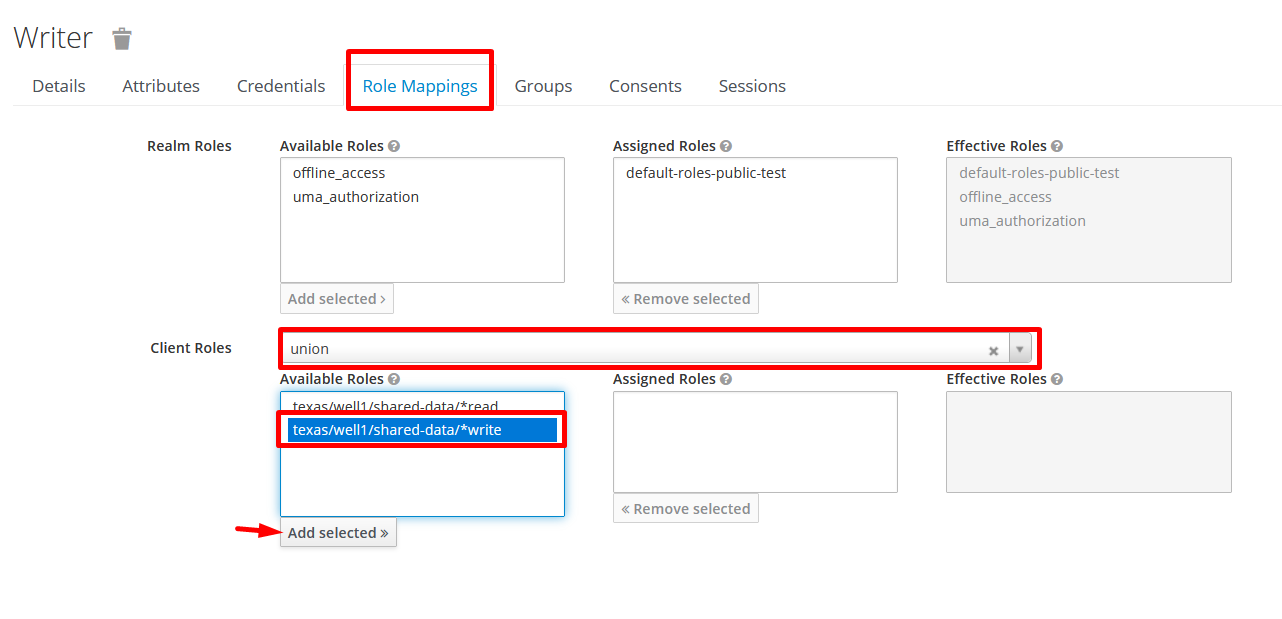
In the writer user’s edit section, go to Role Mappings tab and select union in the Client Roles list.
Once this is done, check the texas/well1/shared-data/*write role and click the Add selected button in order to assign this role to writer user.
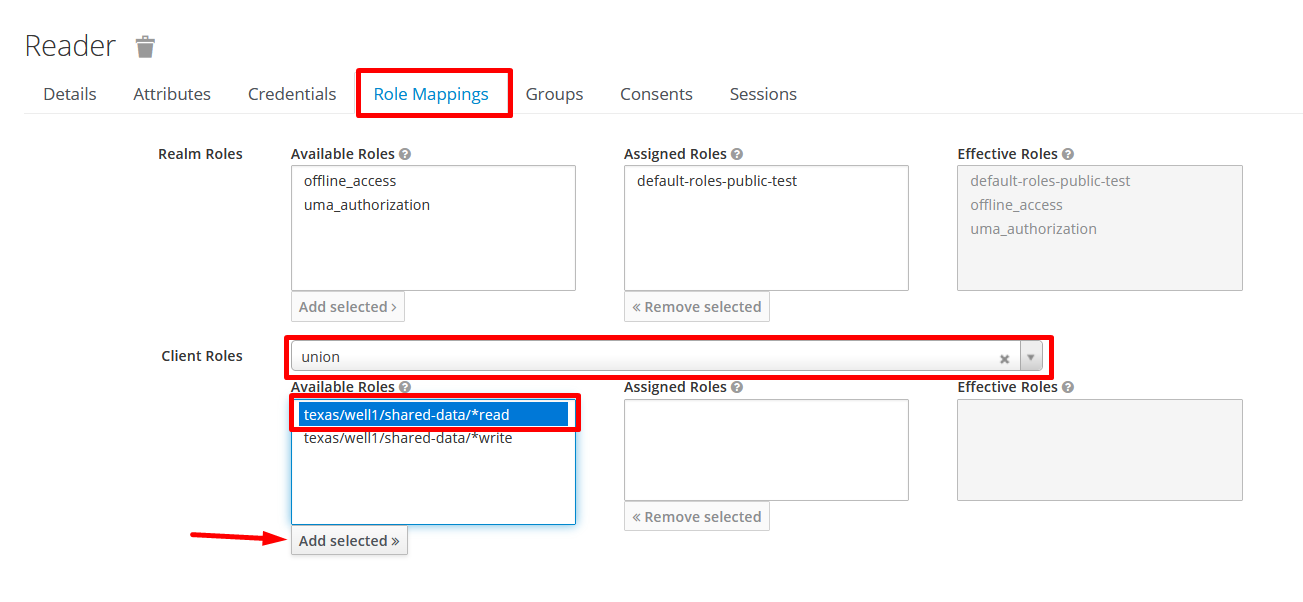
Going through the same process, assign texas/well1/shared-data/*read role to reader user.

The purpose of assigning these roles (with you as the administrator) to the users is to give them access to Union resources. Now you can run the following examples.
Using REST API
The purpose of this section of the guide is to manually test the REST API connection between your local machine (as reader and writer users) and Union servers. This will also give you a preview of pushing data into Union and retrieving it. Since this is easier explained using Postman, we suggest downloading and install Postman using this link.
Postman collection
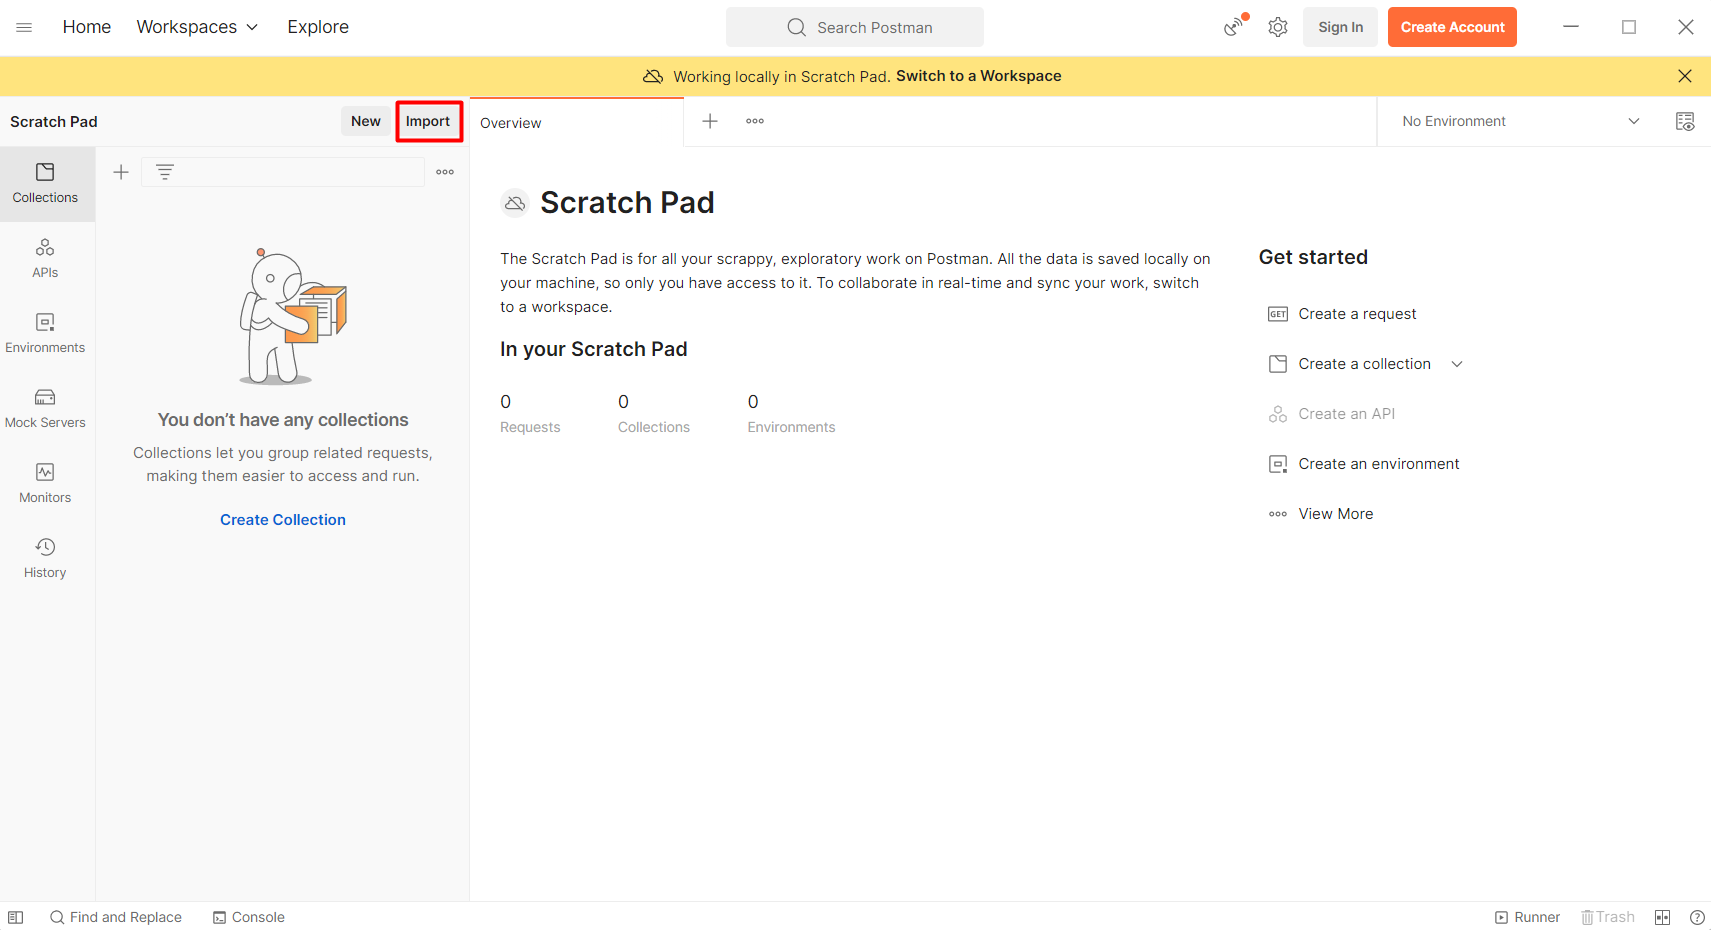
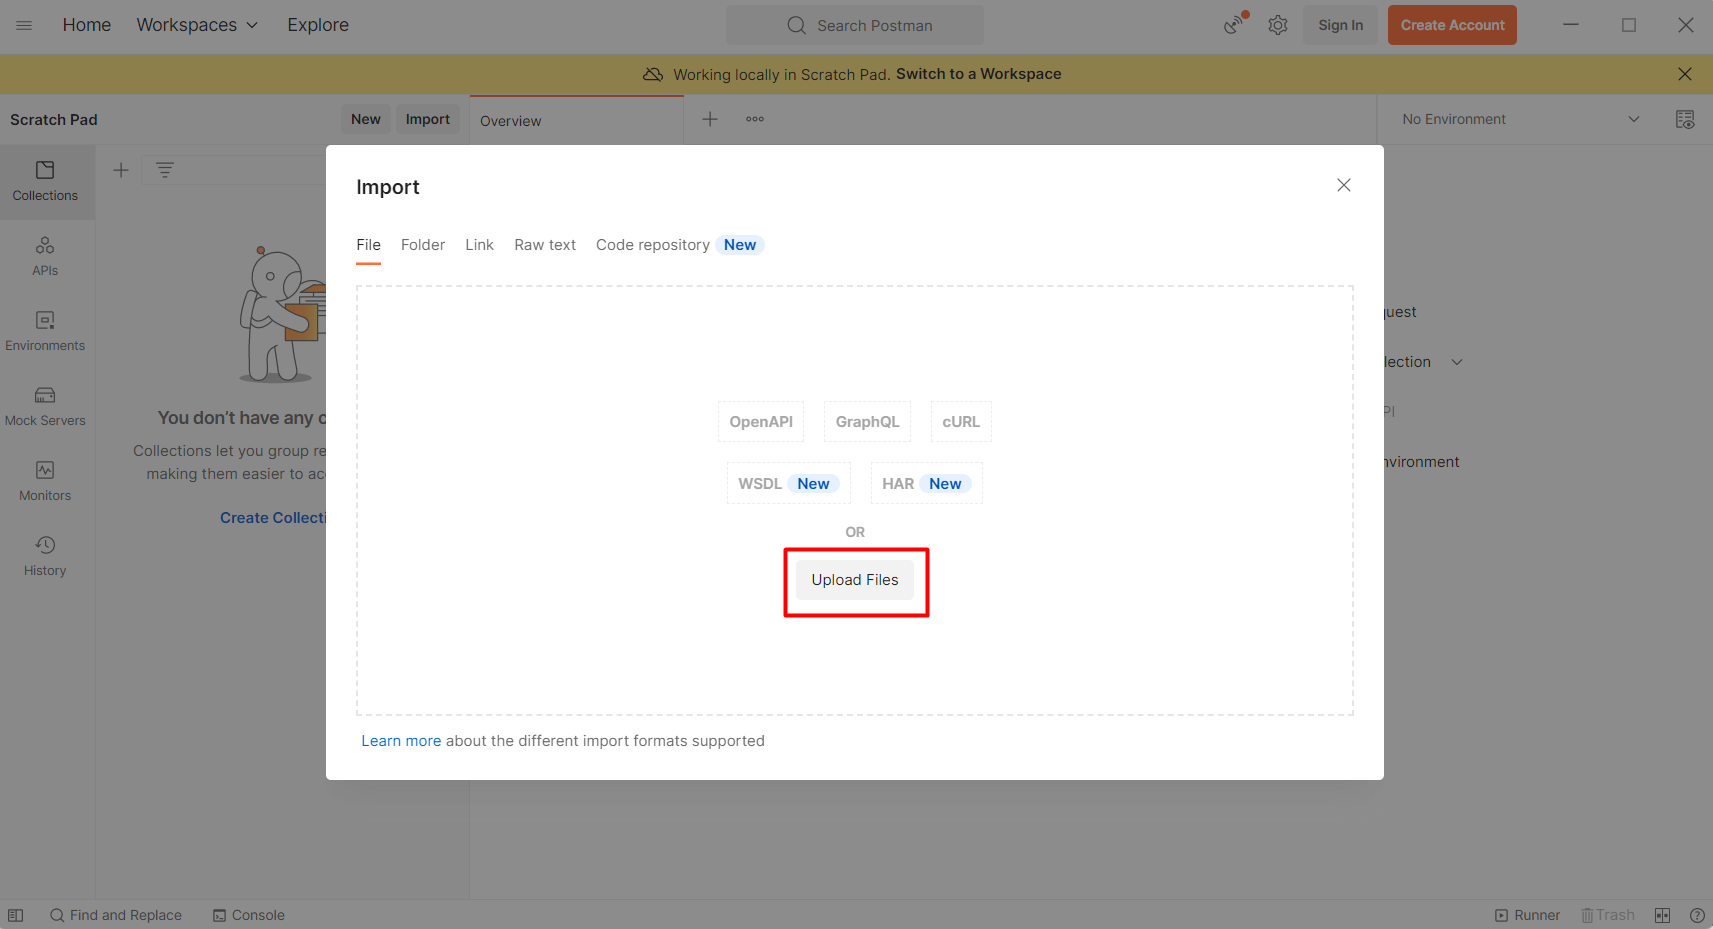
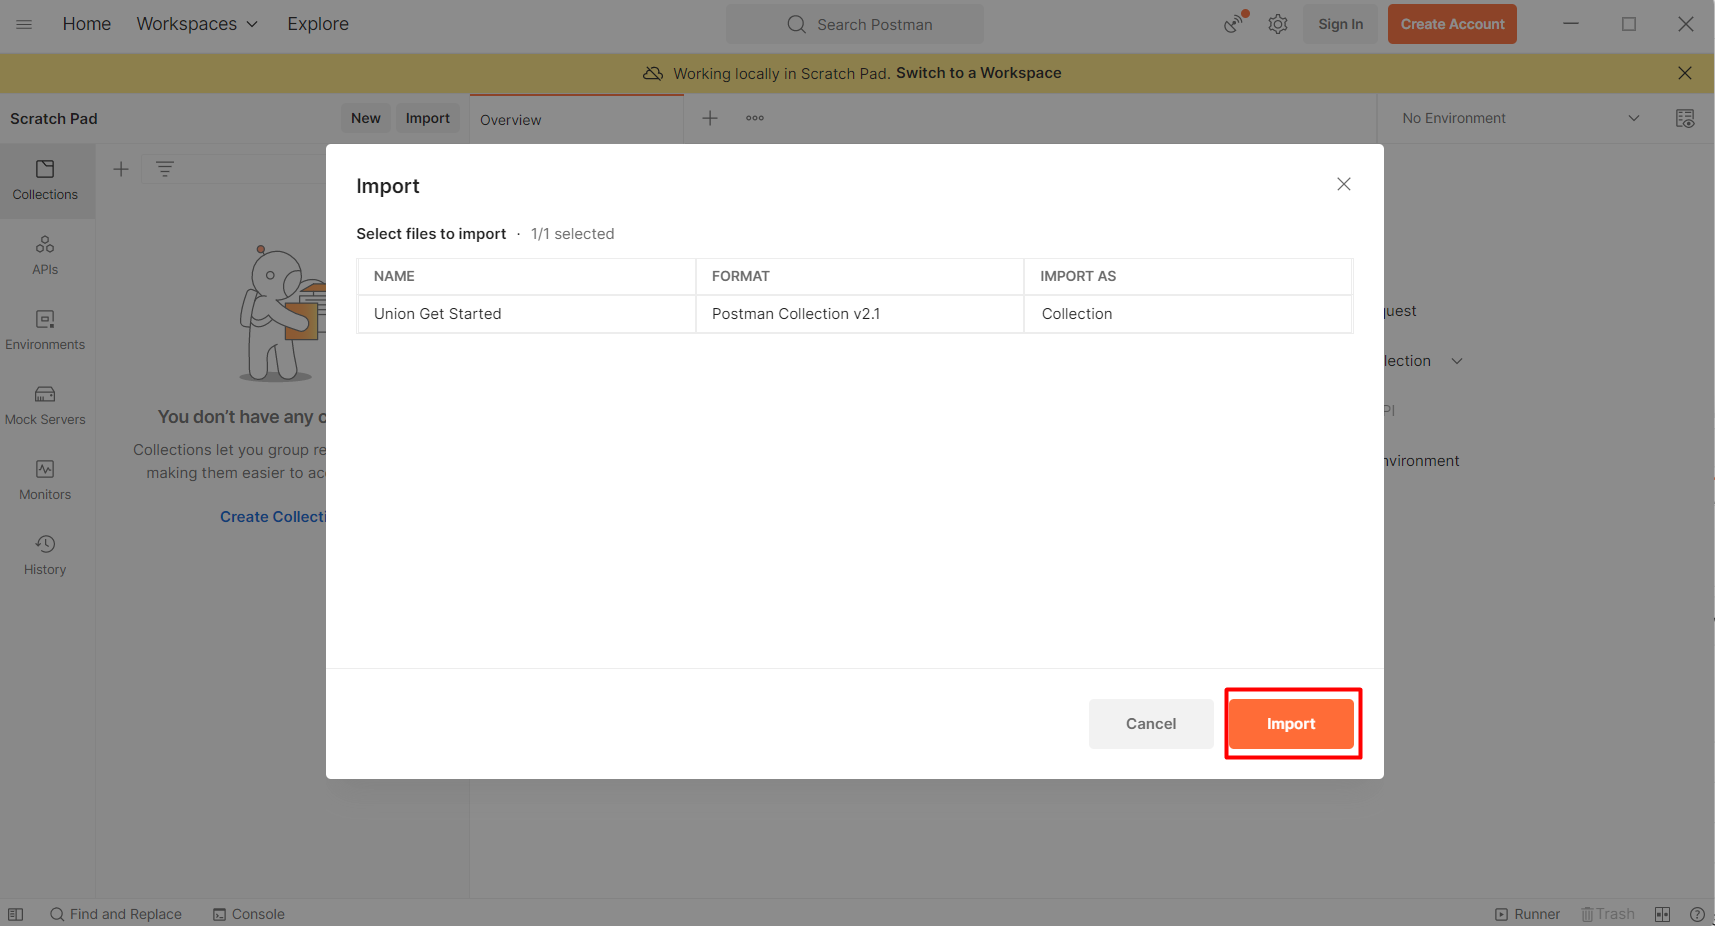
Once you have installed Postman, download
the Union Get Started Postman Collection
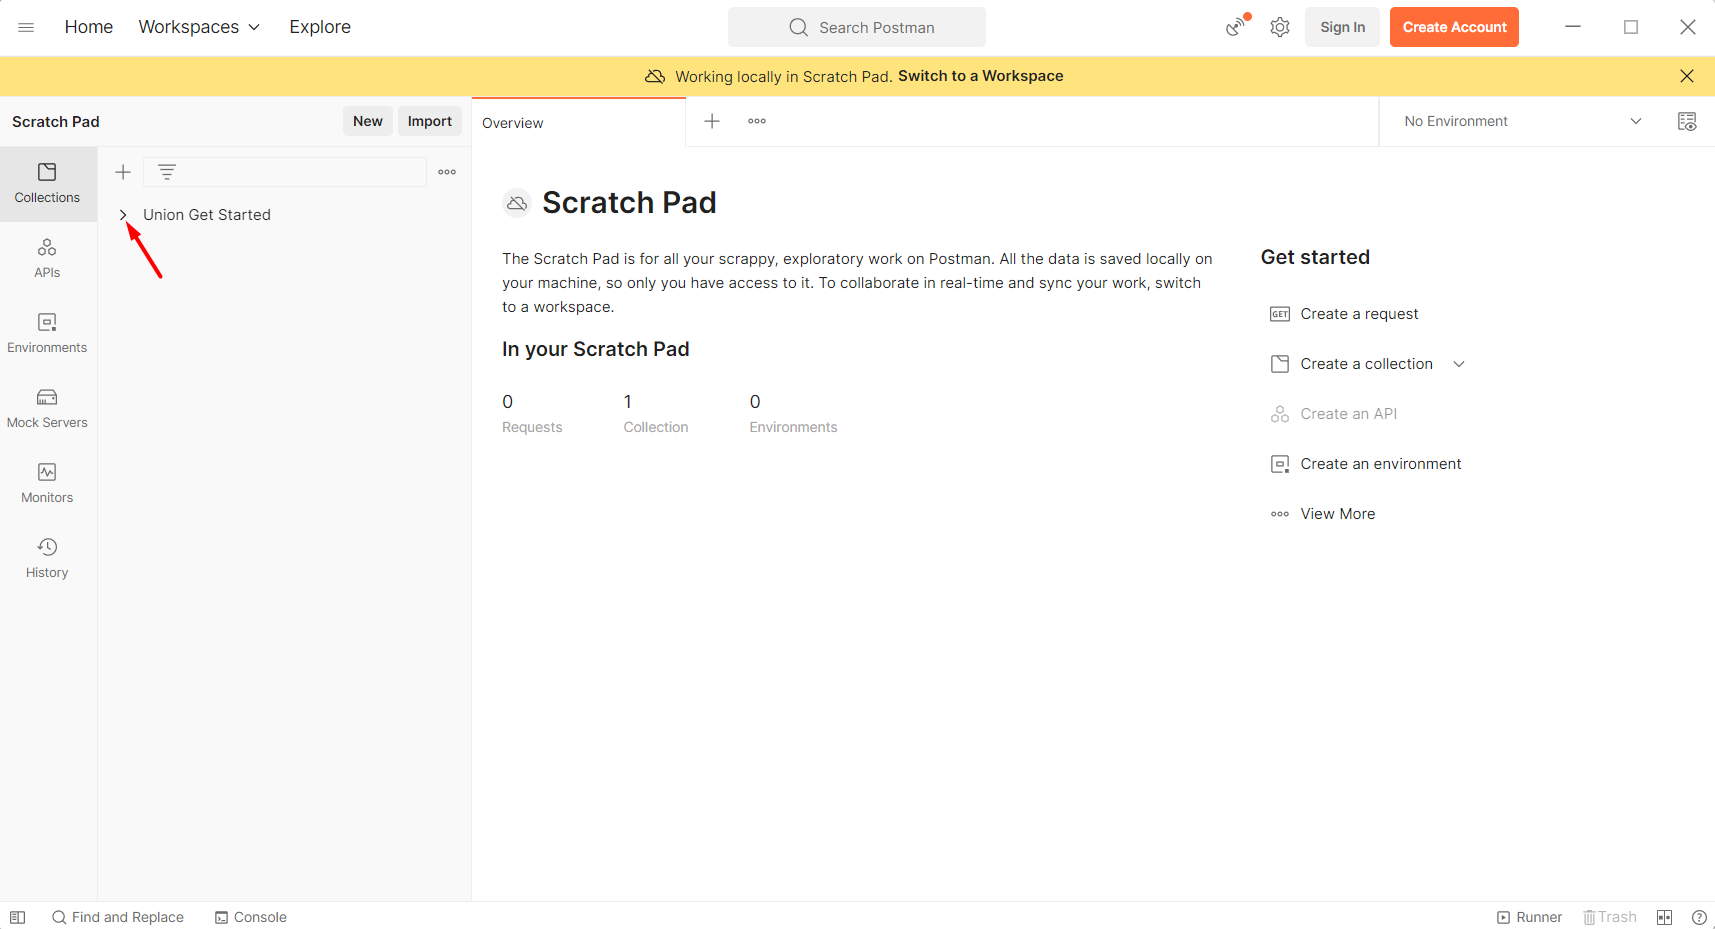
and import it into Postman as showns below:
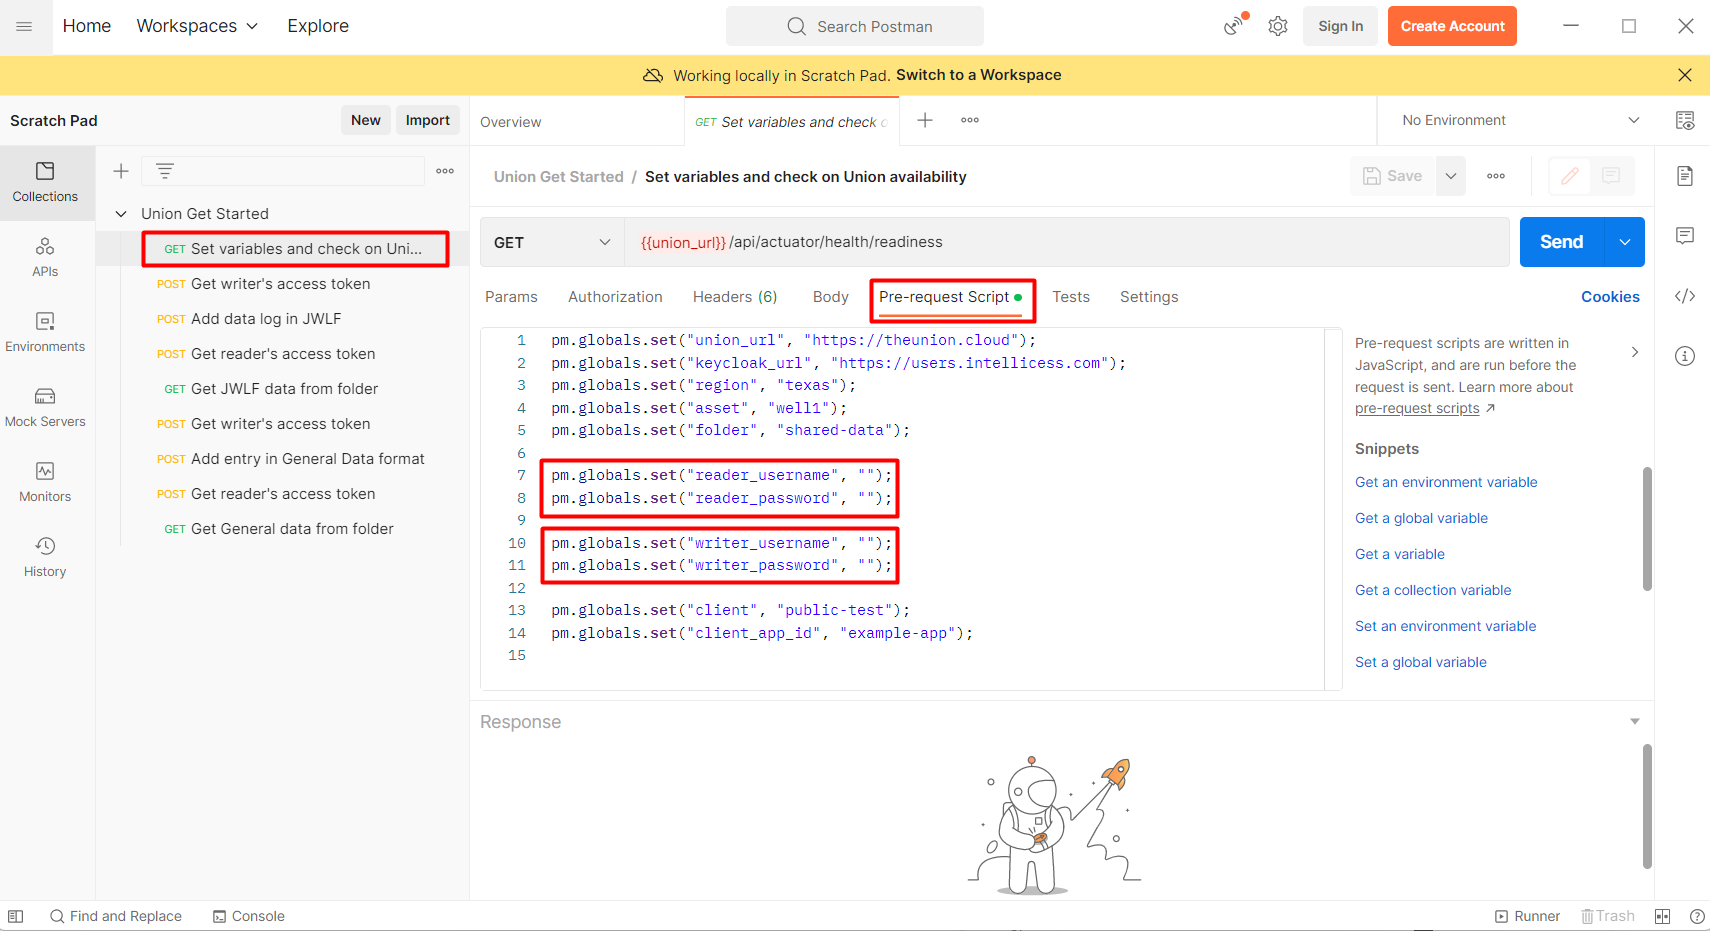
 Once the collection has been imported, go to the first endpoint to fill in the username and password for the writer and reader user accounts that you created.
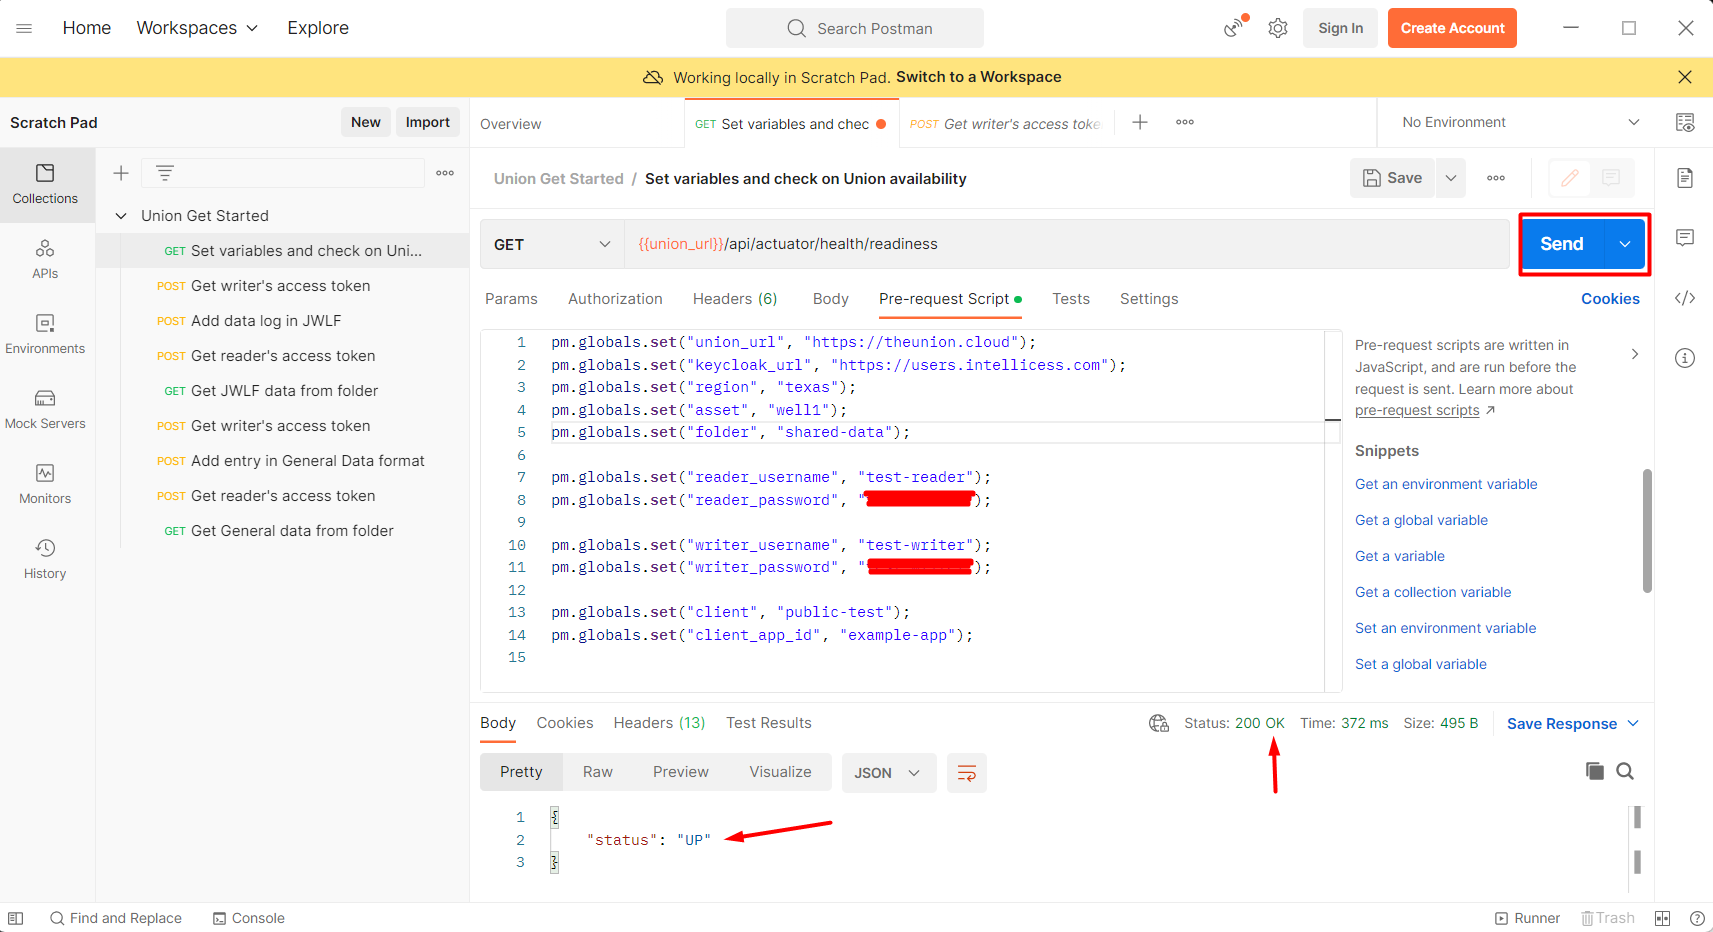
 After the credentials are set, press the Send button to save them and see if Union is up.
 Next, before you are able to save the data into Union, you would need to authorize the writer. To do this, go to the next endpoint and click the Send button.
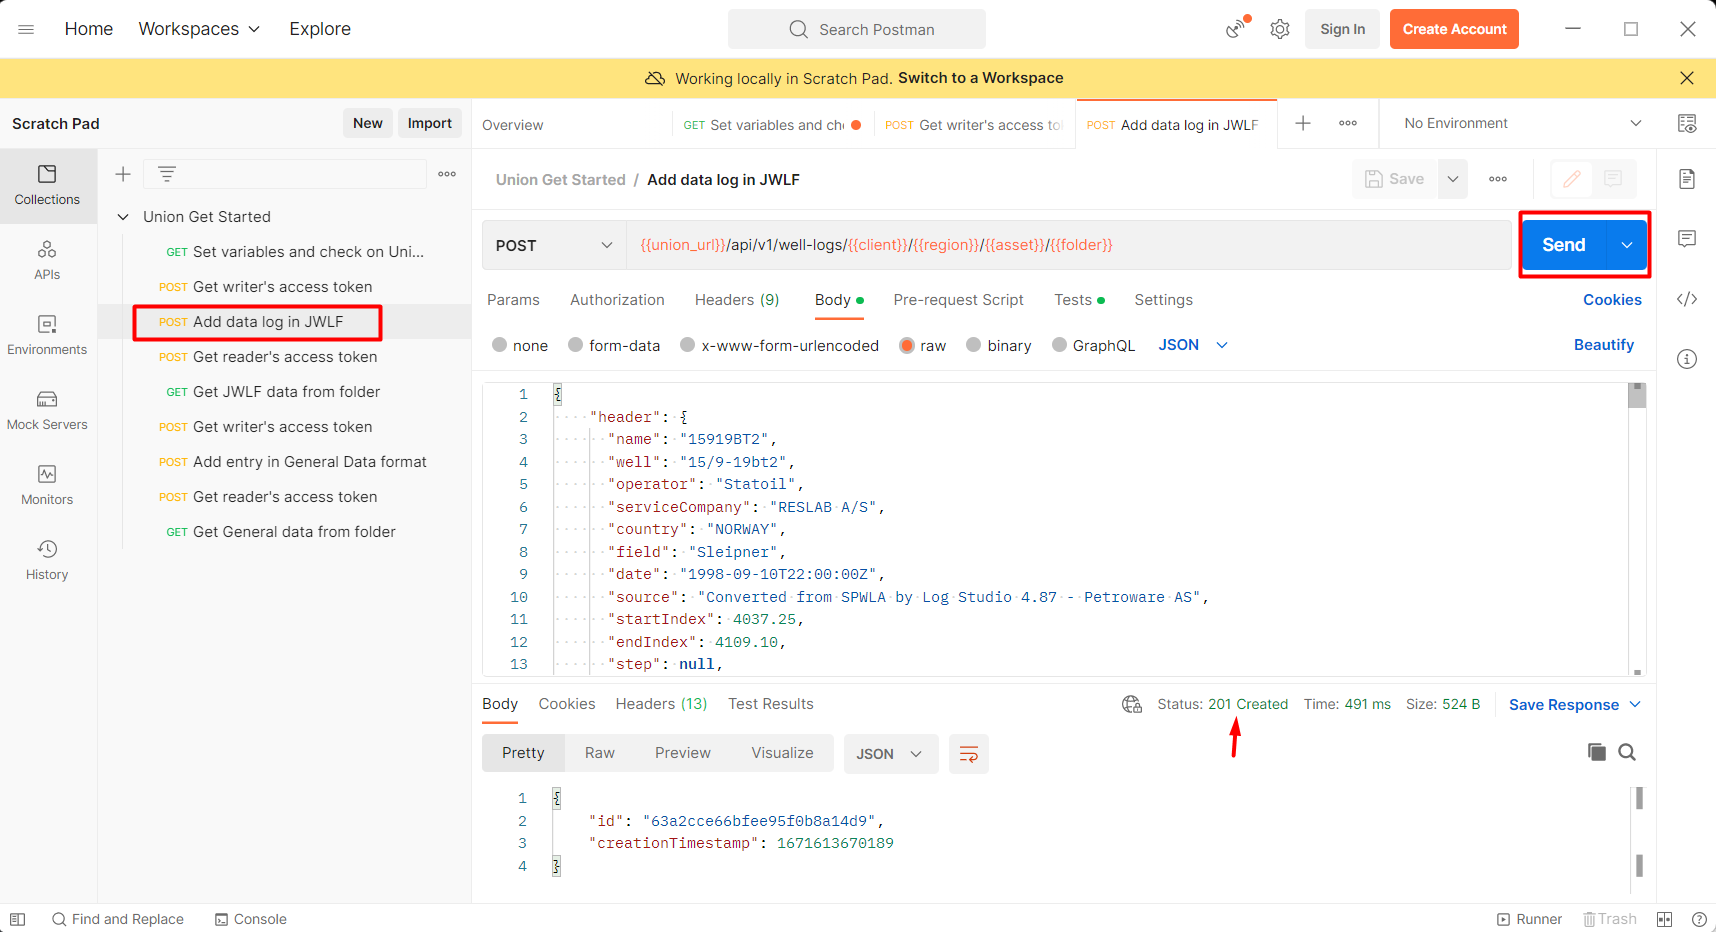
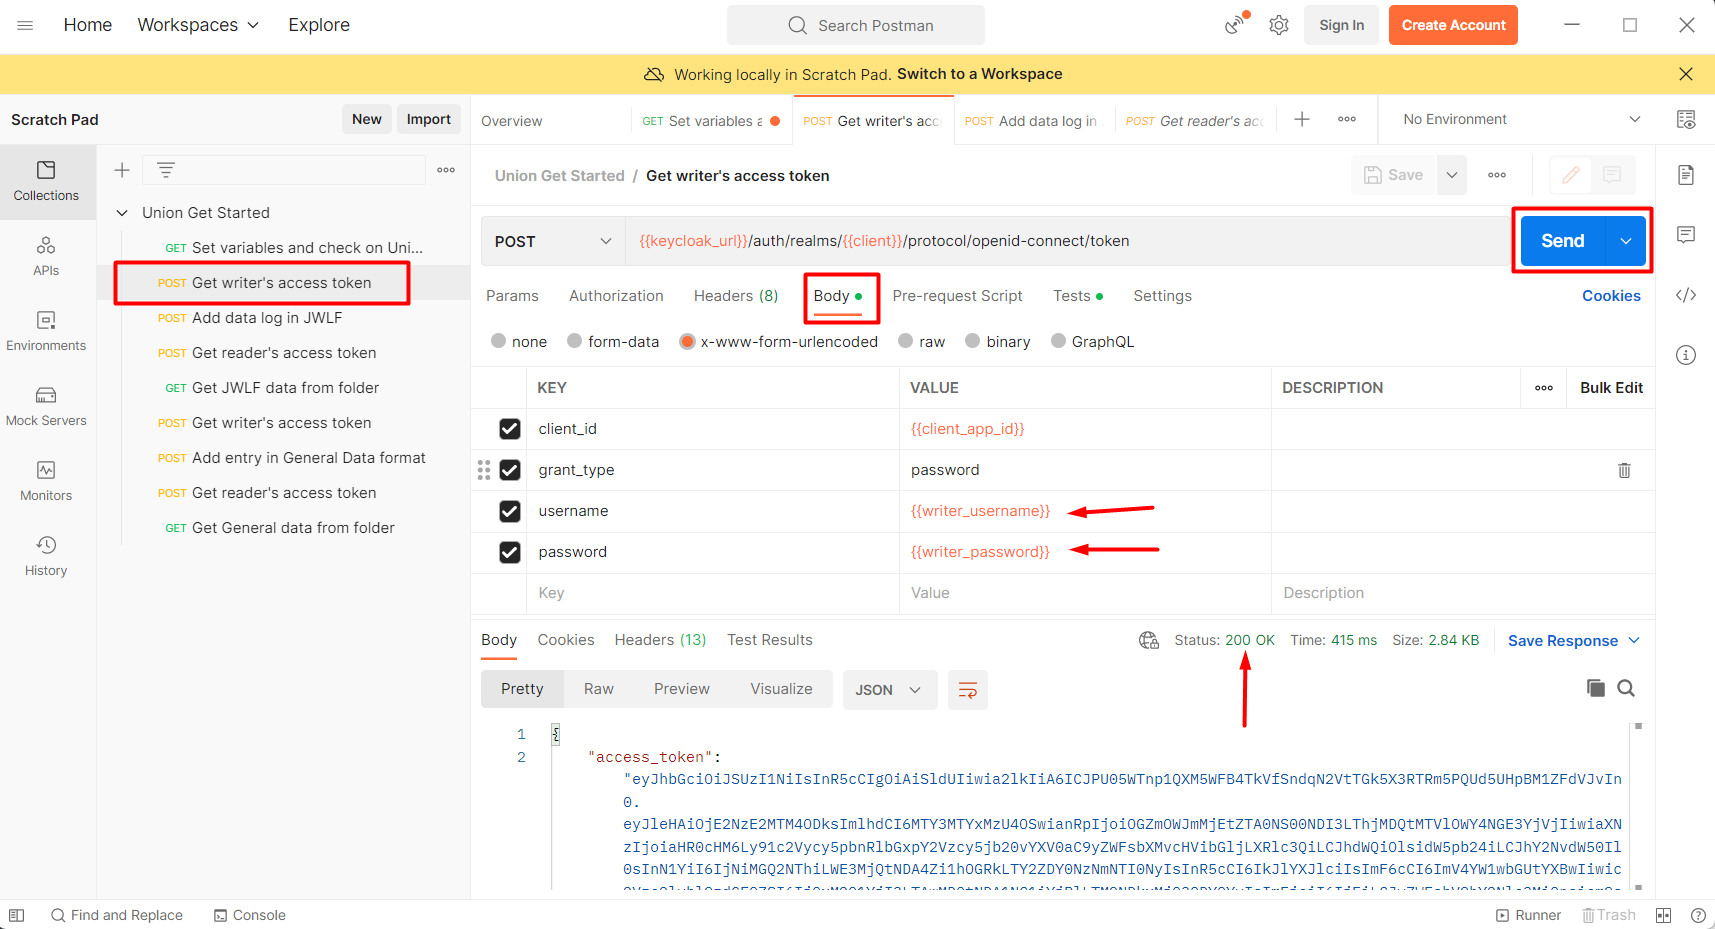 Once the writer is authorized, you can save data into Union. Go to the next endpoint, switch to Body section to see what will be sent to Union and hit the Send button.
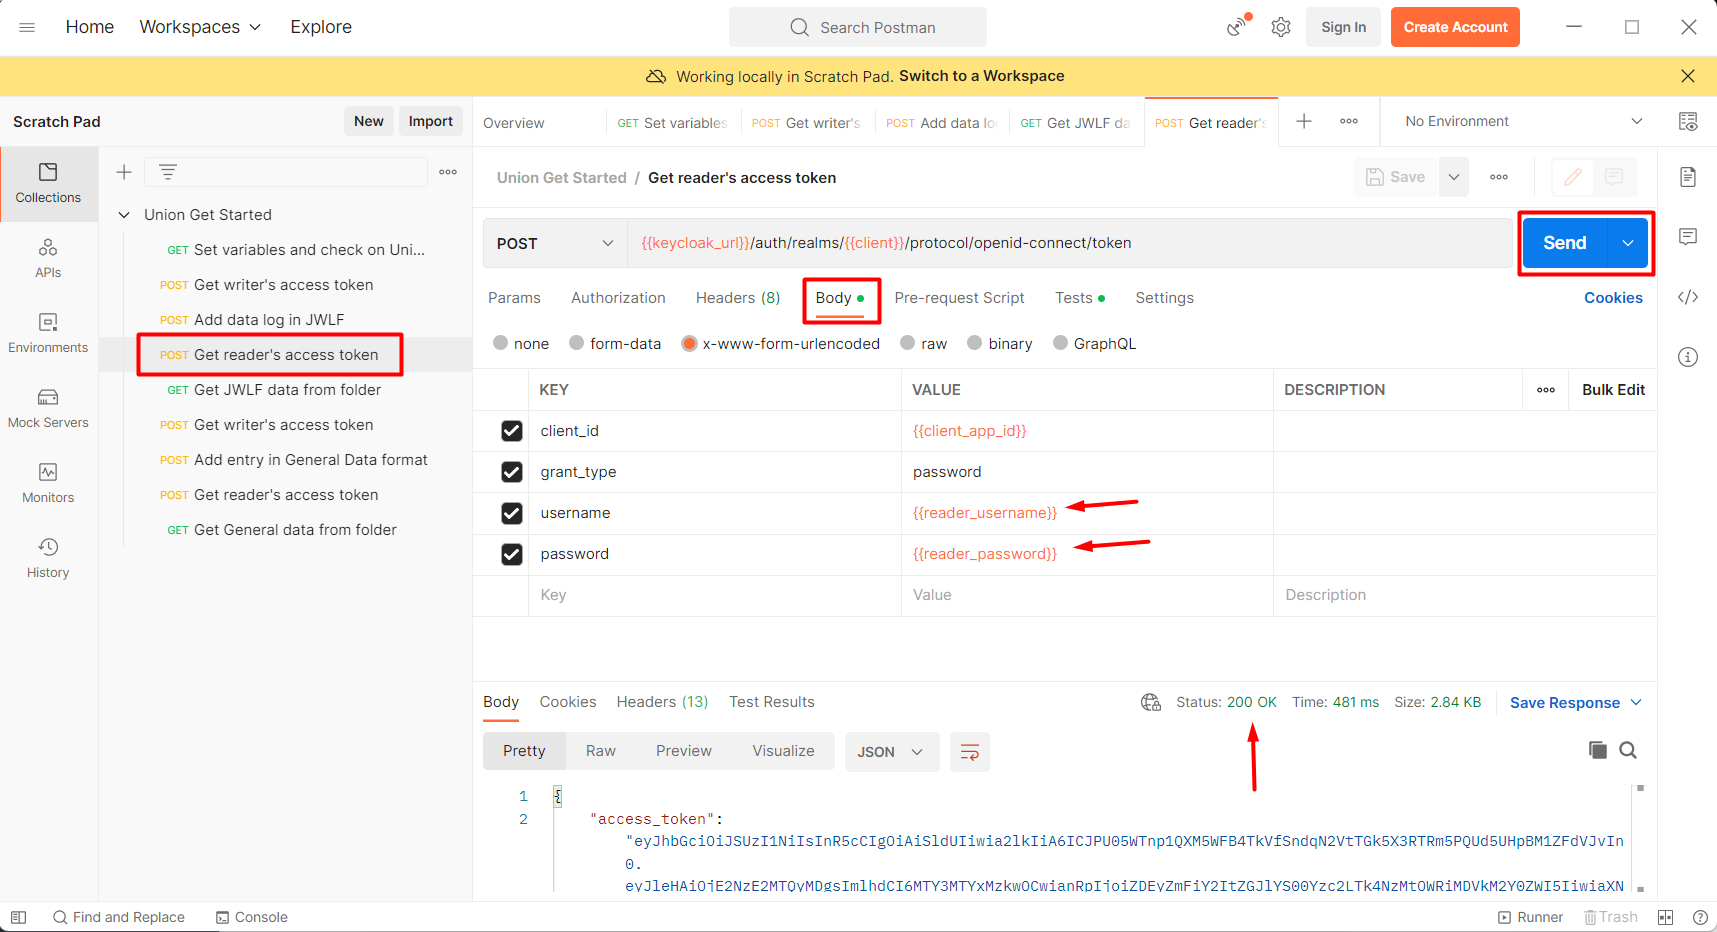
 Now, let’s see if you (the reader) can read the data that was sent to Union. Go to the next endpoint and click the Send button to authorize the reader.
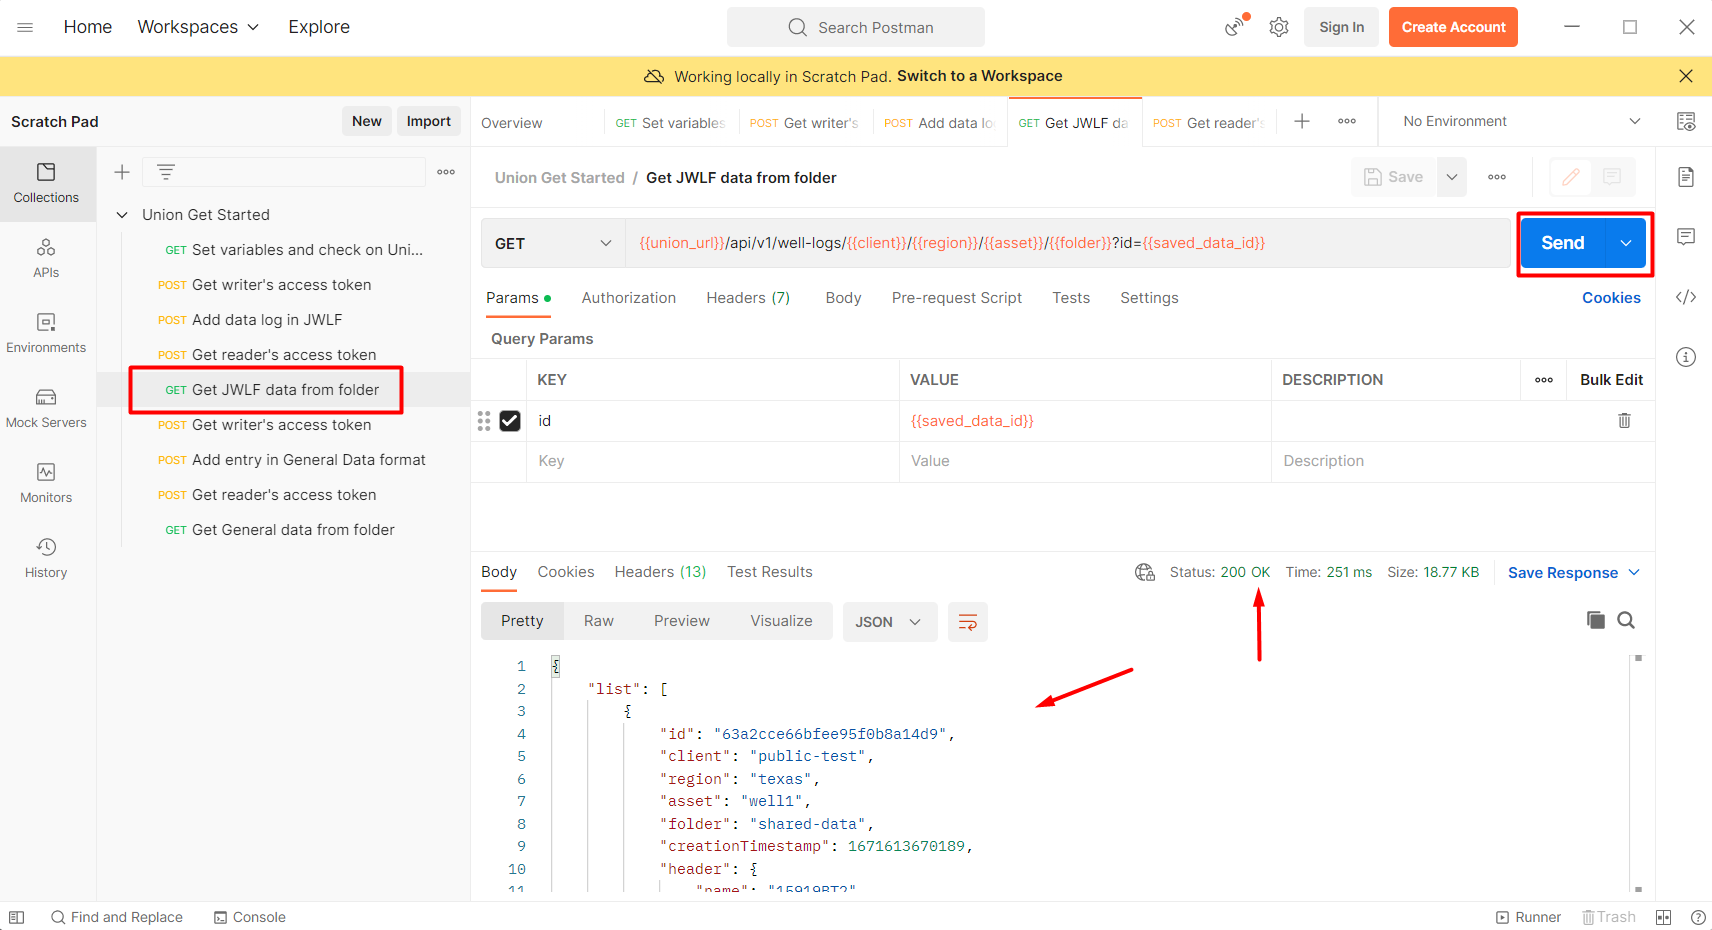
 Go to the last JWLF related endpoint and push the Send button to read the data that you previously sent to Union as the writer.
 Run the remaining endpoints as well to see how even “General non JWLF formatted Data” can be sent to and saved in Union.
API Documentation
For more information on the endpoints available in Union’s REST API, look at Swagger API documentation).
Writer and reader example
The purpose of this section of the guide is to showcase how Union can work with code that can be integrated into your software. This link navigates to a GitHub repository with example code to test automated reading and writing tasks with Union. The repository also contains a README.md files describing how to run the code.
Workflow explanation
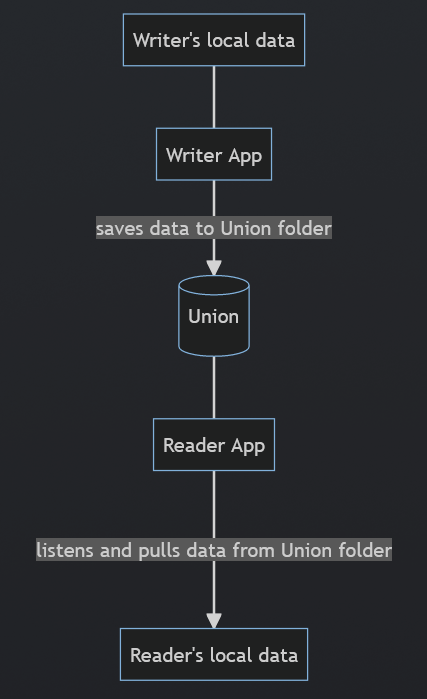
This diagram above depicts the data share workflow demonstrated through the example code in the repository – primarily, two apps that exchange data using Union. The writer app sends all data to Union that is stored in the writer folder.
Once the data gets stored in the Union database, the reader application pulls it and store it in the local reader folder as a json file in the JWLF format.
Once the task is completed, the data in the writer folder is deleted. The code can be modified to meet your specific needs, and we are happy to assist you in the process.
Python tutorial
If you wish to run the Python example using PyCharm, you can navigate to our guide for a step by step tutorial.
Python example in PyCharm
![]()
If you don’t have PyCharm already installed, please install it from here.
The community version of PyCharm is good enough for this exercise.
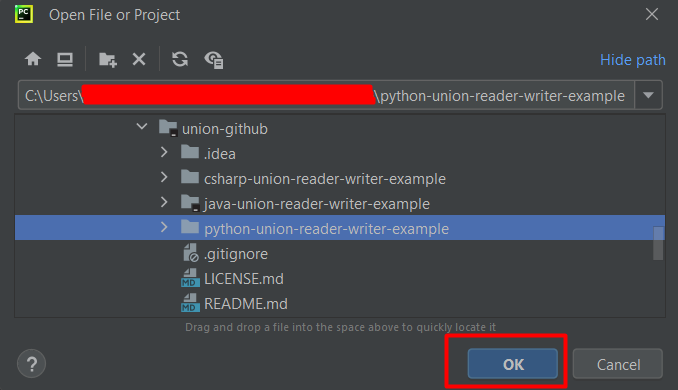
On the greeting popup, click the Open button and then pick the folder with the Python example.

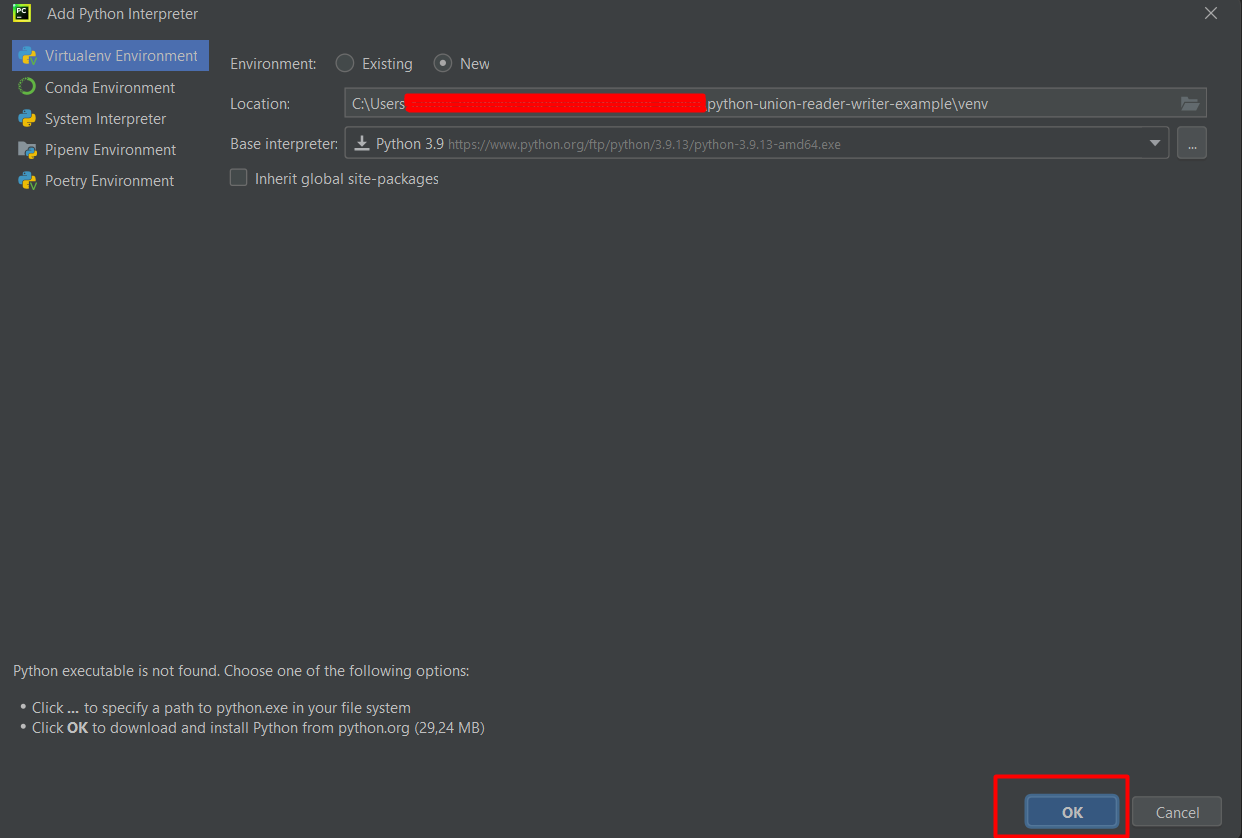
In Pycharm, click the No Interpreter in the right-bottom corner, then Add Interpreter and Add Local Interpreter.

Don’t change anything and click Ok.

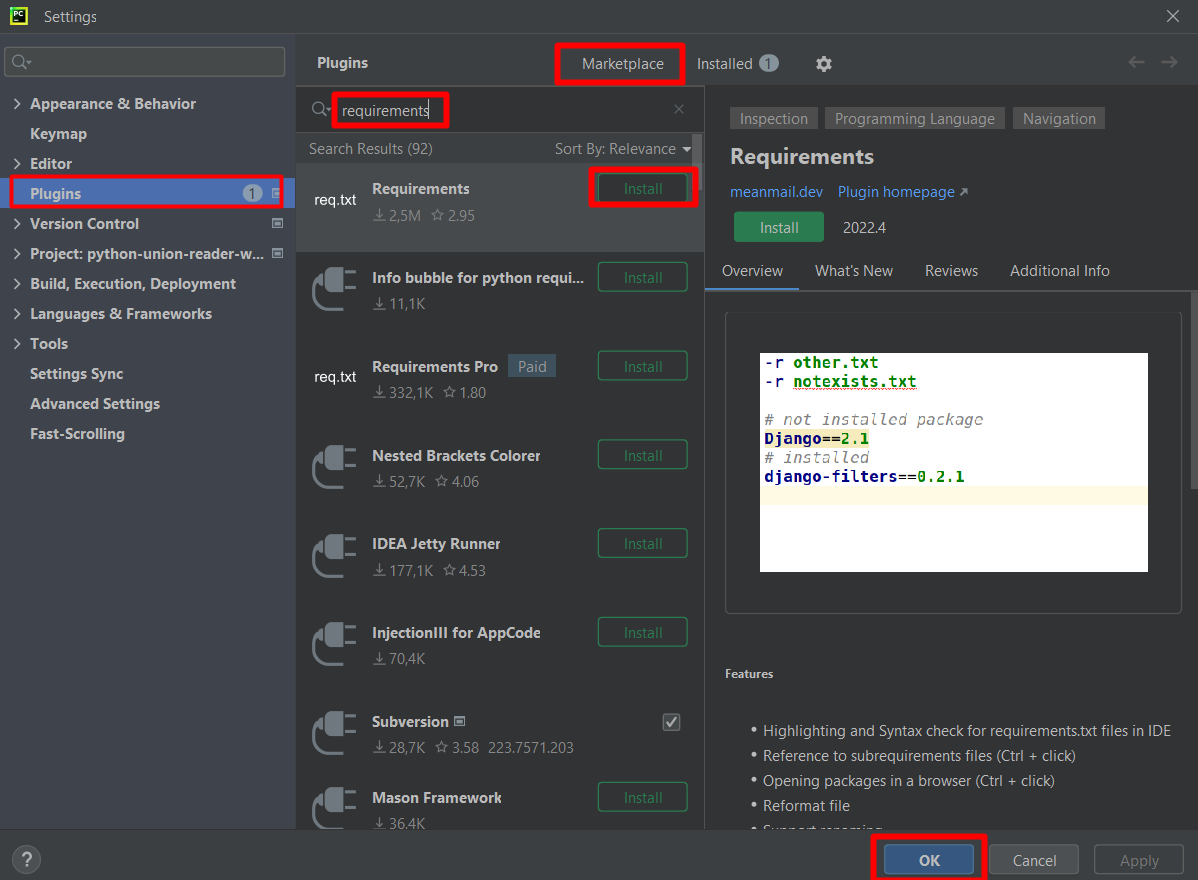
Now, you need to install the Requirements addon. If you already have these, you can skip these steps.
Otherwise, first click the File tab in the upper-left corner and then pick the Settings option.
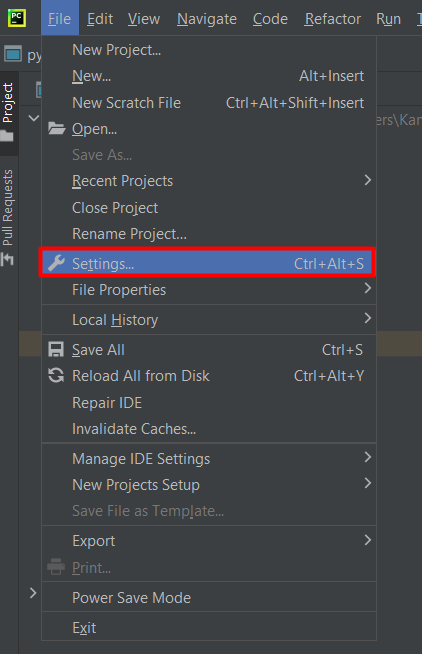
In Settings, switch to Plugins tab and type in ‘requirements’ into the Marketplace search bar. Find the plugin from the list and install it.
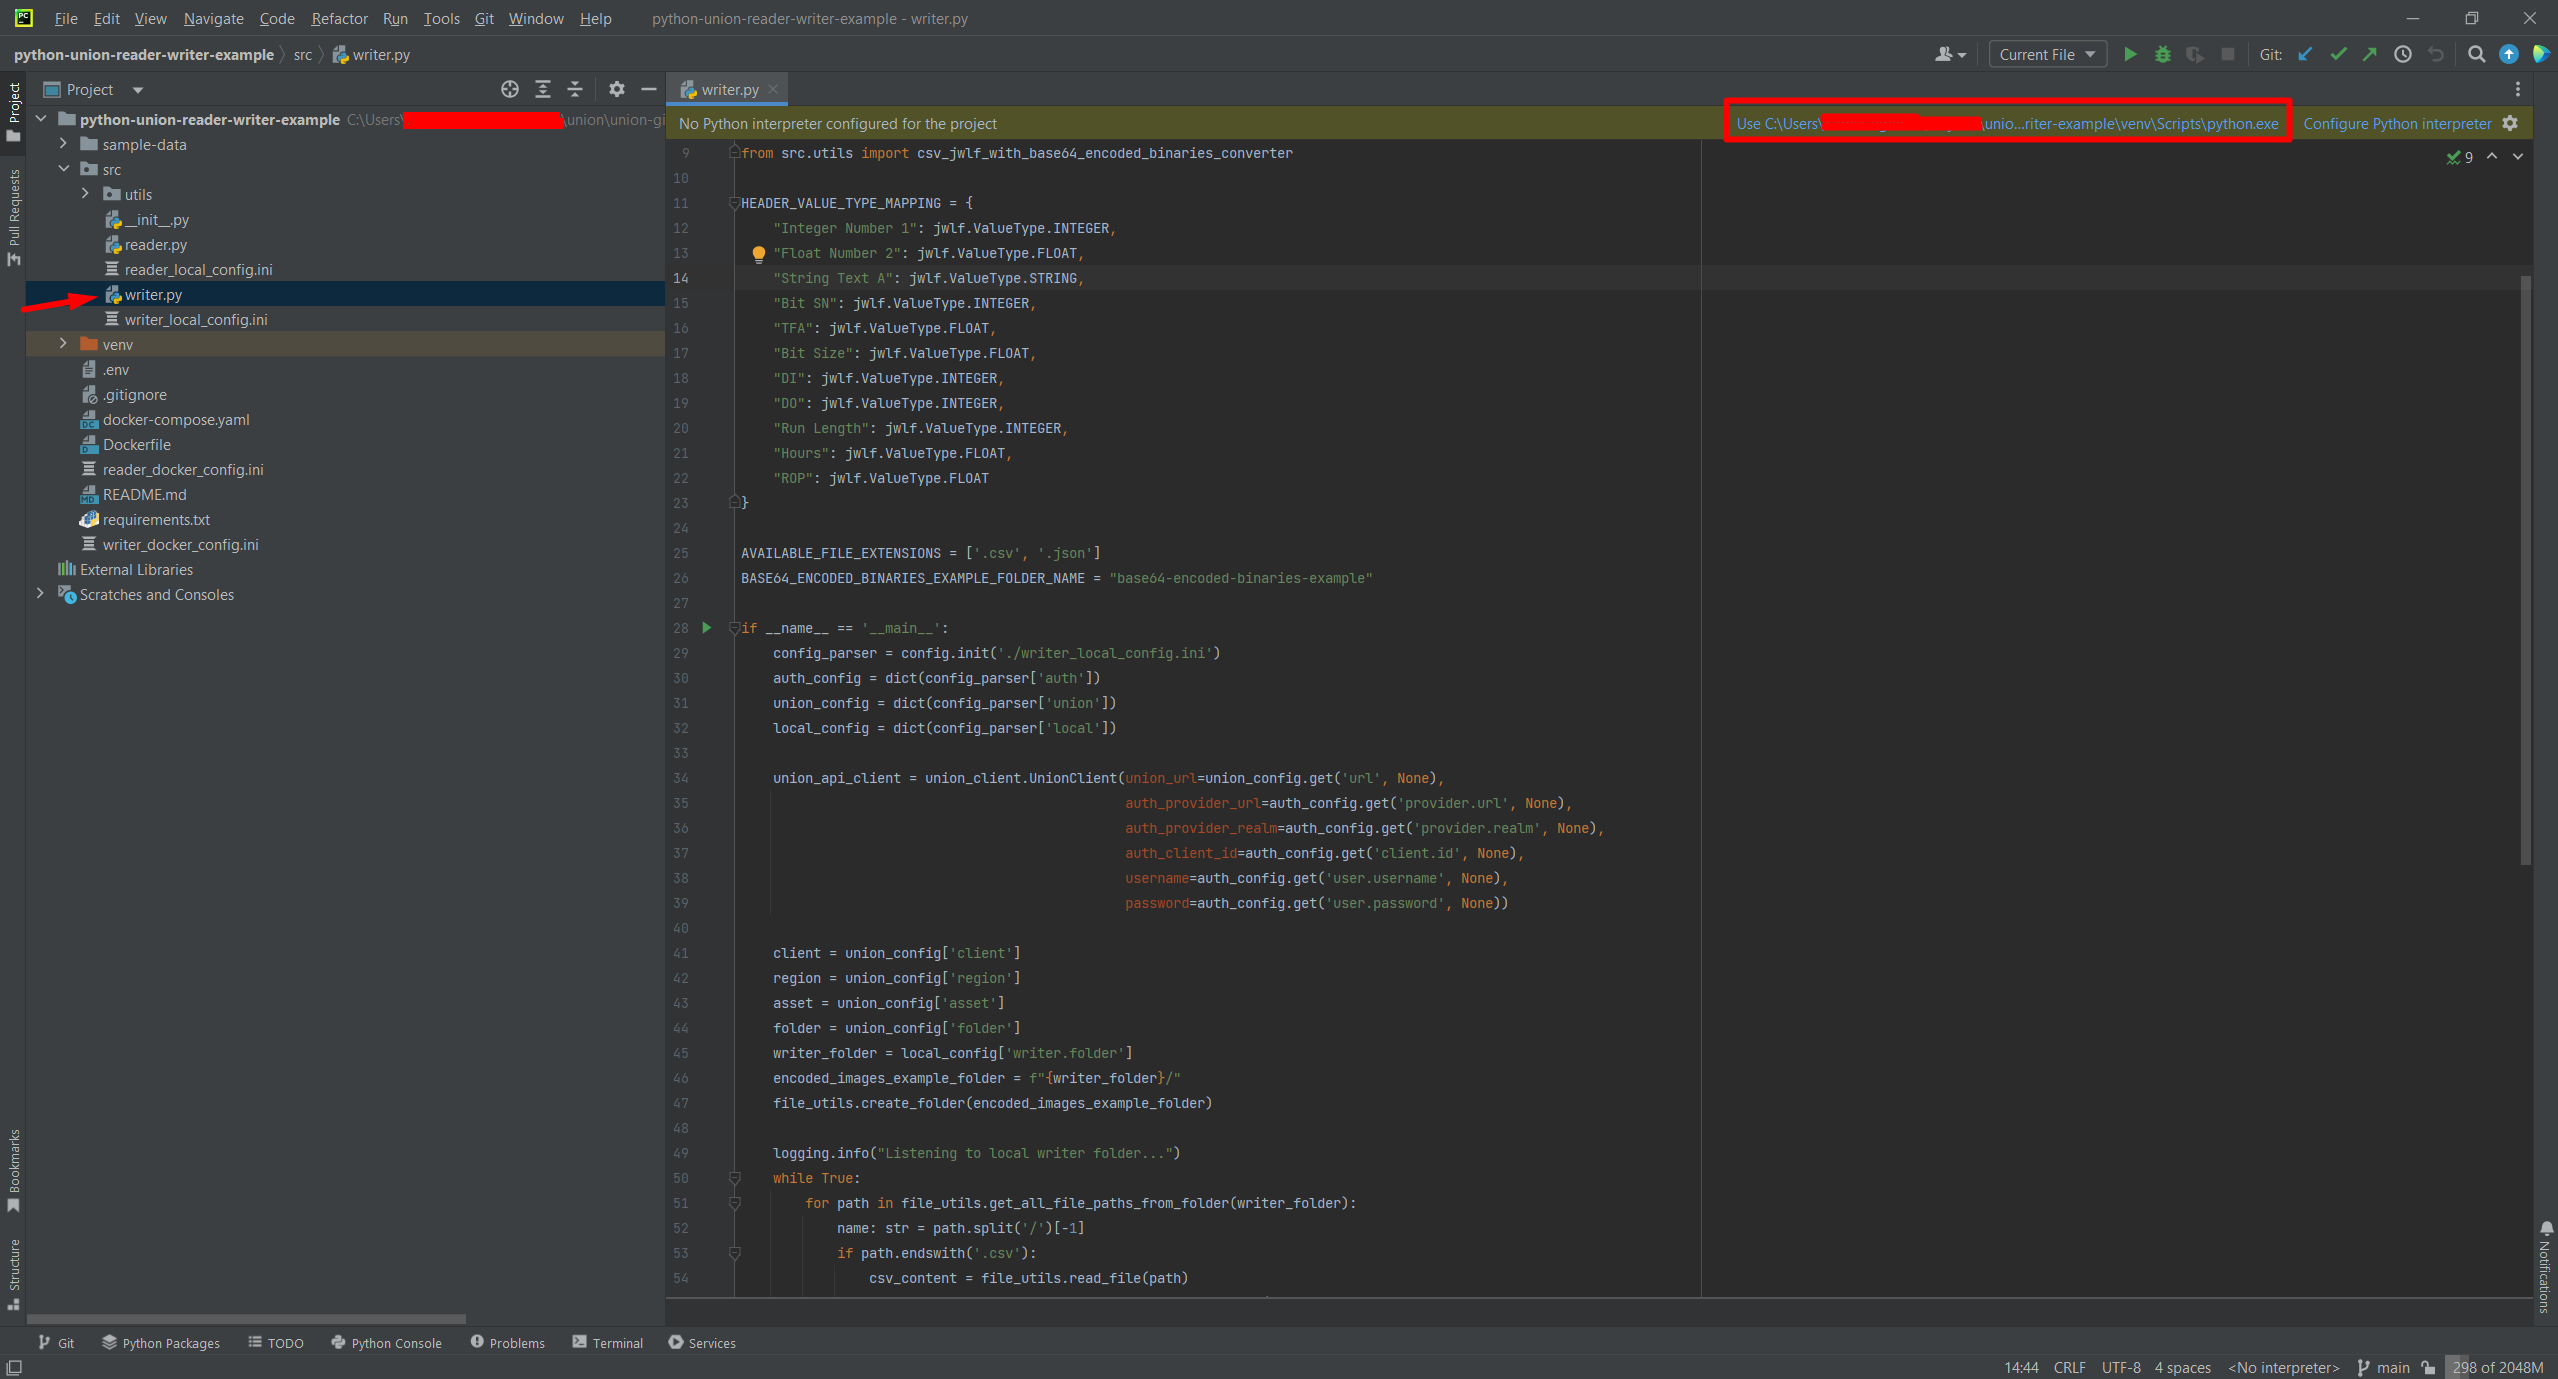
Once the plugin is installed, Python interpreter must be configured and requirements must get installed.
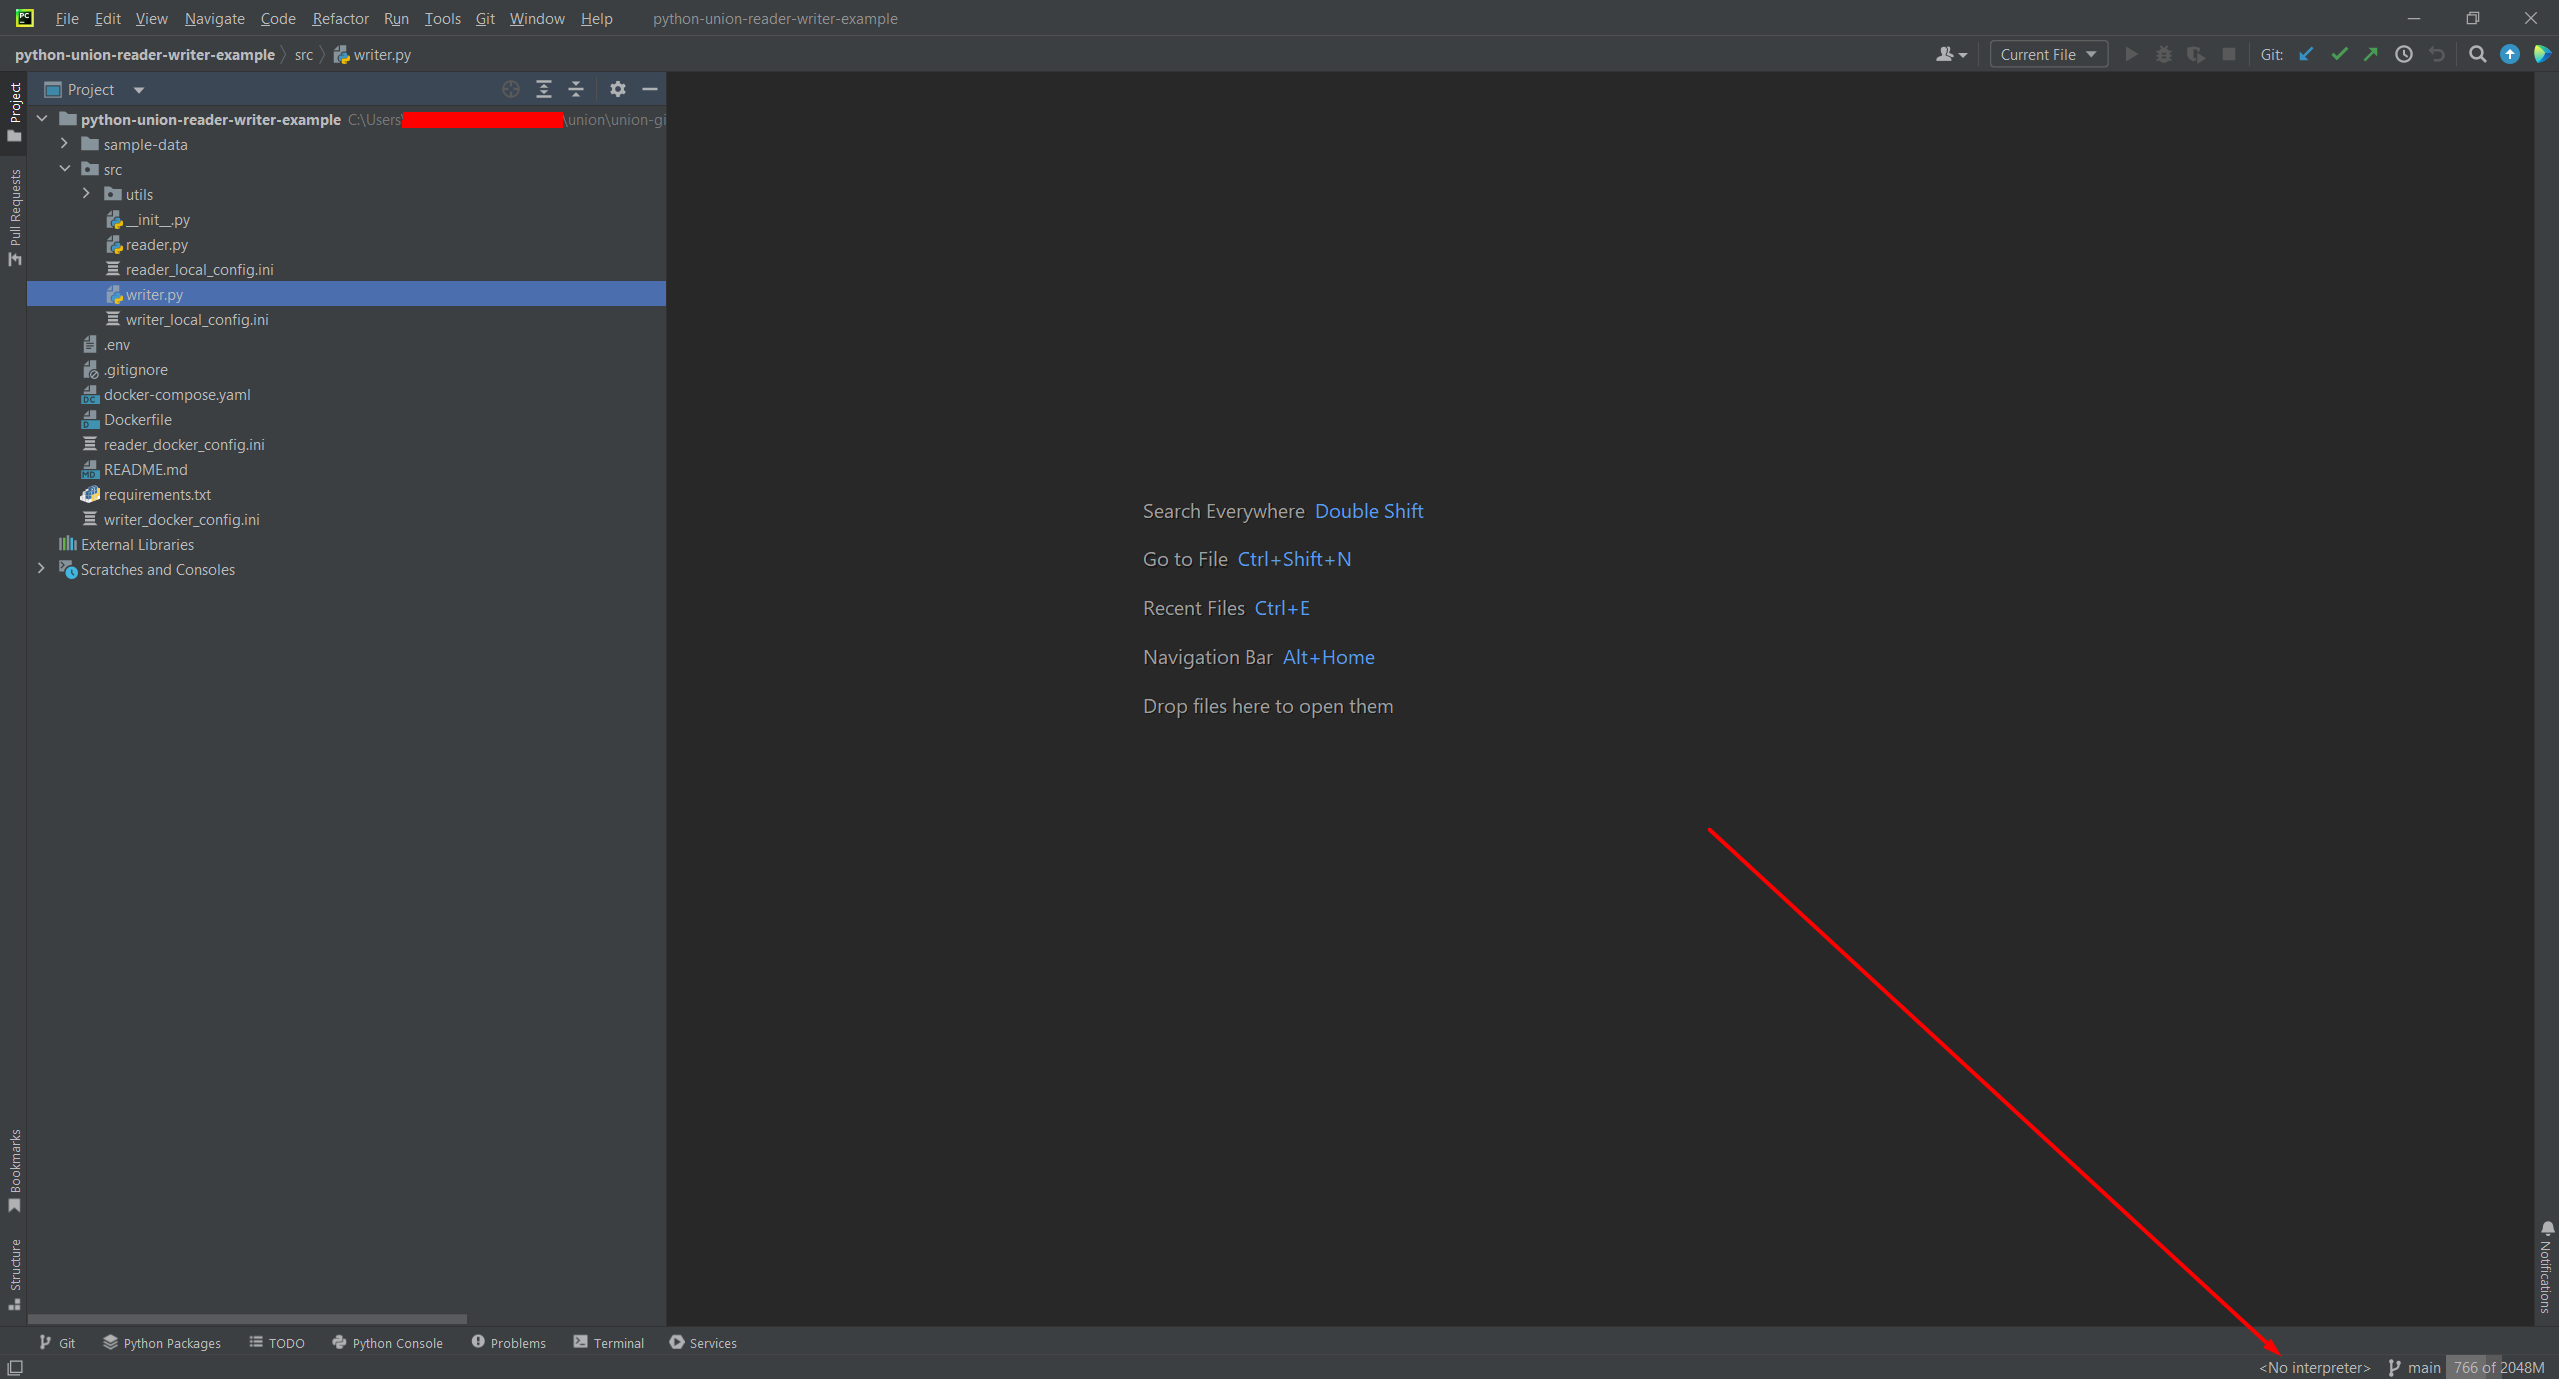
In order to do this, open writer.py file. Then click a prompt titled Use … in the upper-right corner.
When the interpreter is configured, in the same place press the Install requirements prompt.
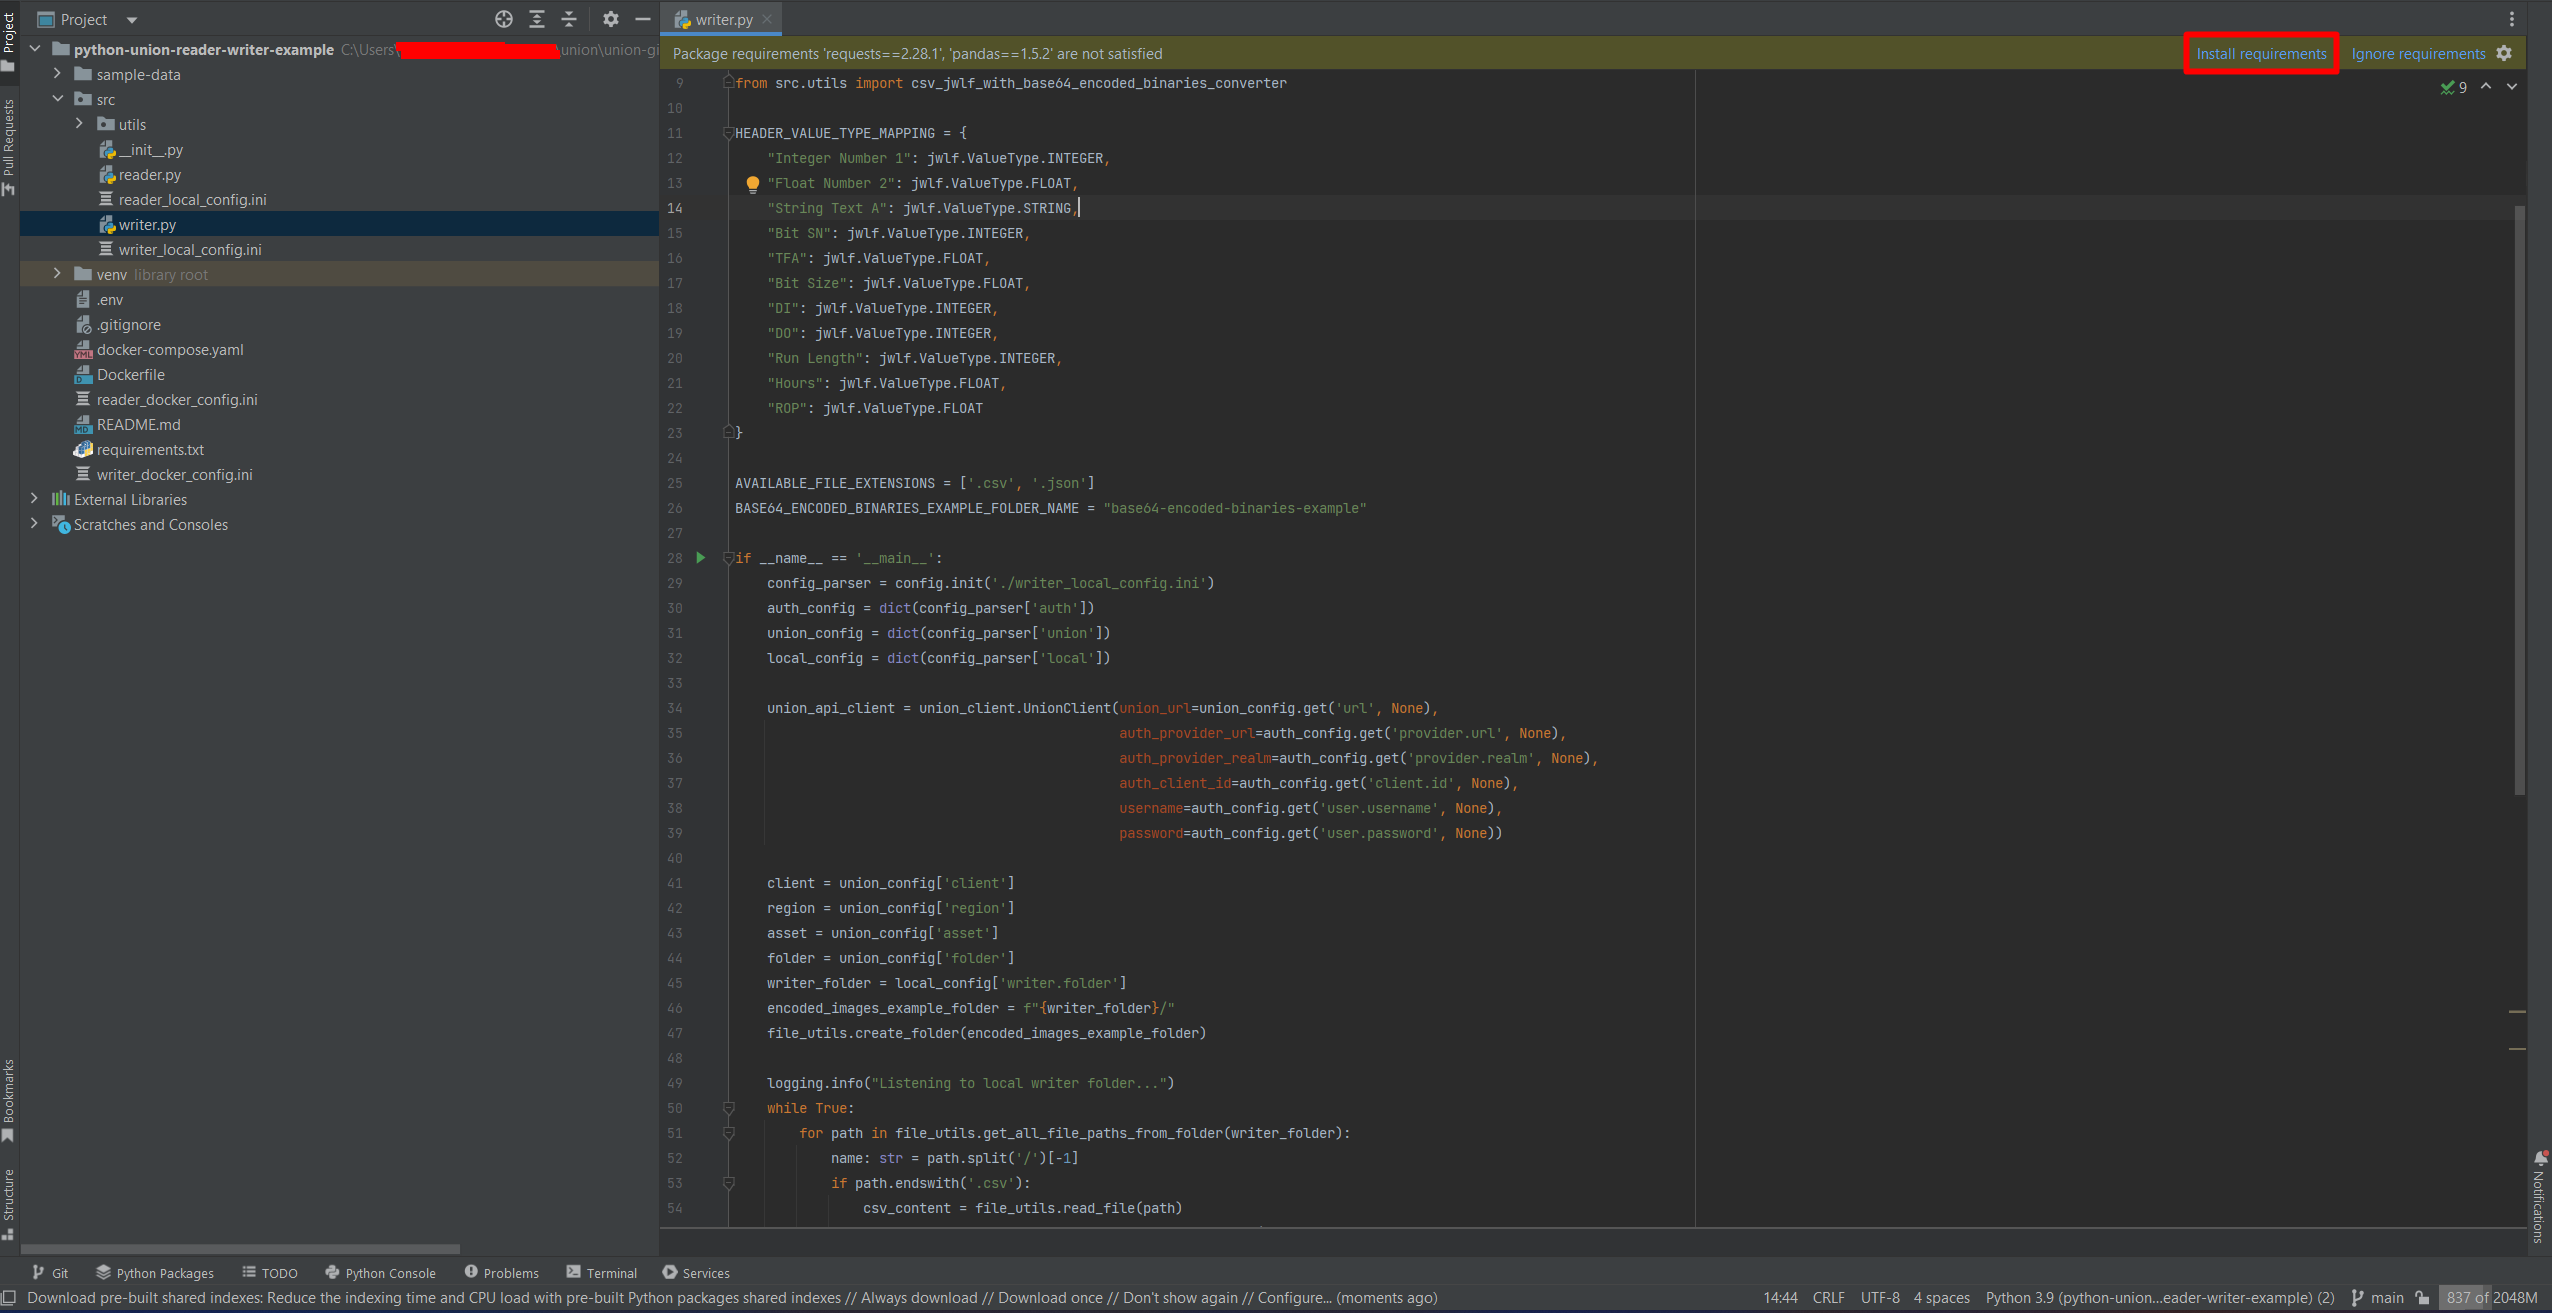
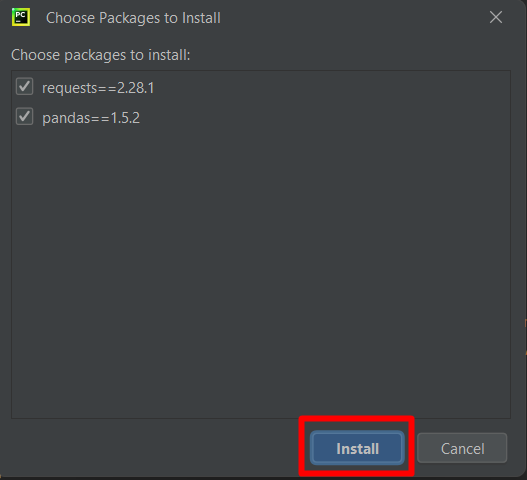
Then, click the Install button with both options checked.
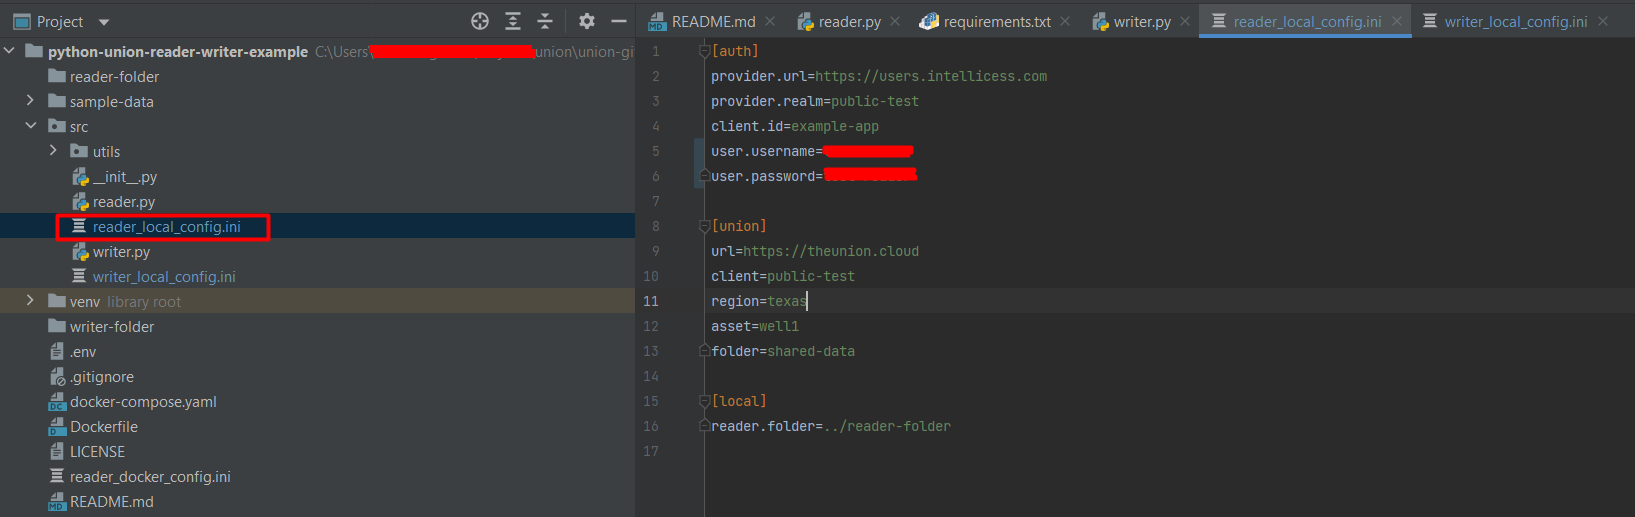
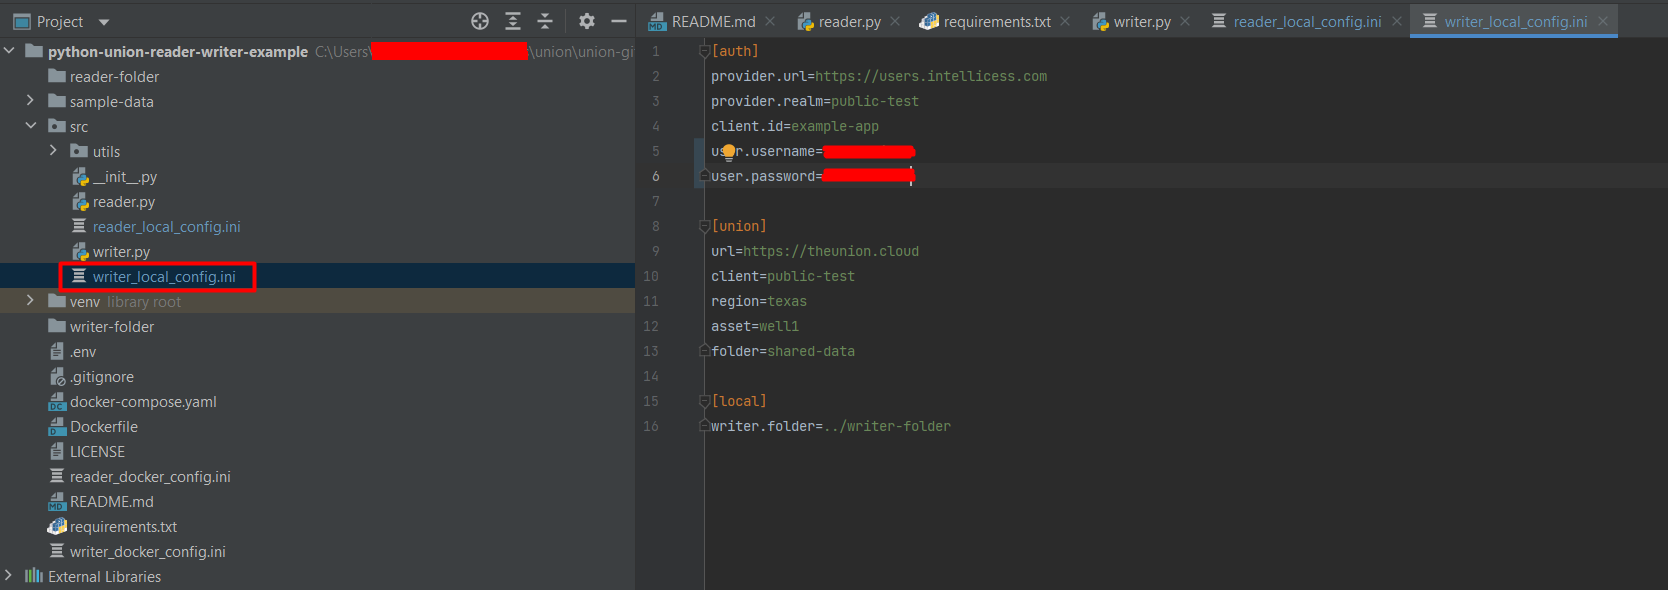
Now, you need to put the reader and writer users’ credentials that you created in the admin console.
First, go to reader_local_config.ini and fill user.username and user.password with reader’s credentials. Do the same in writer_local_config.ini for the writer account.
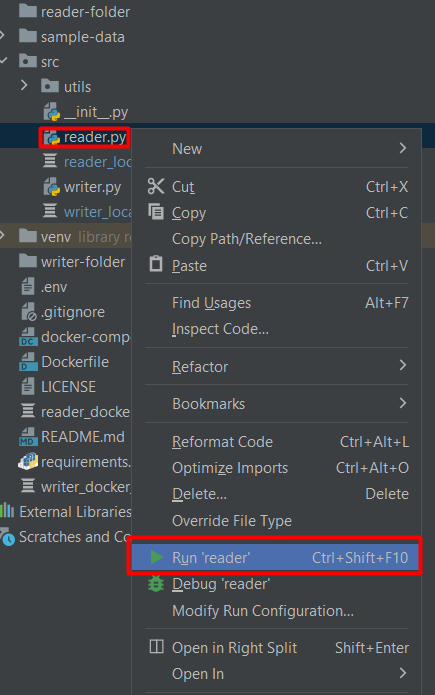
Once the environment is set-up, you can run reader and writer apps.
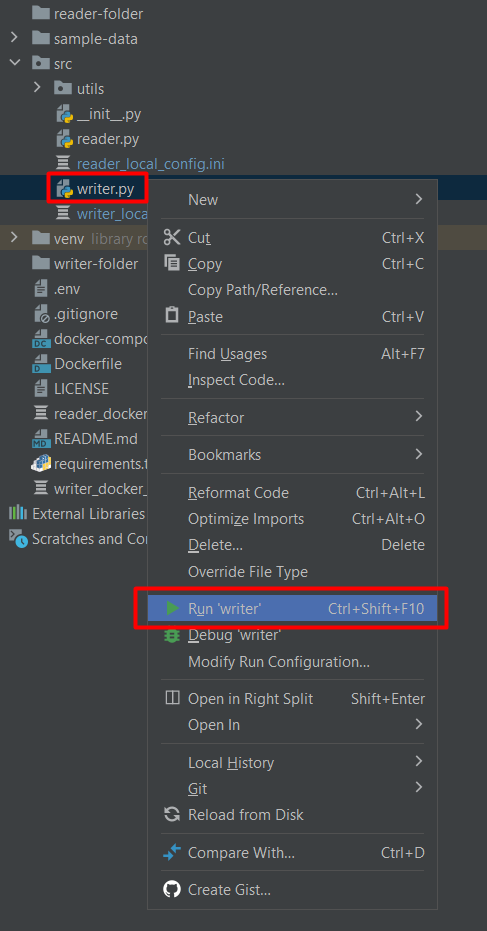
To do this, right click on the writer.py and pick Run ‘writer’. Do the same for reader.py.
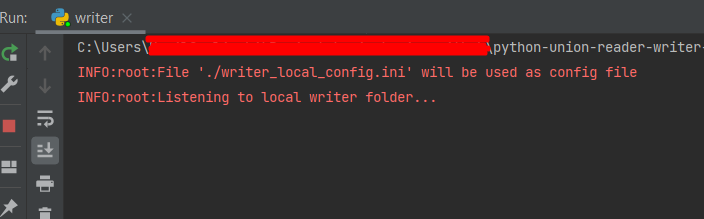

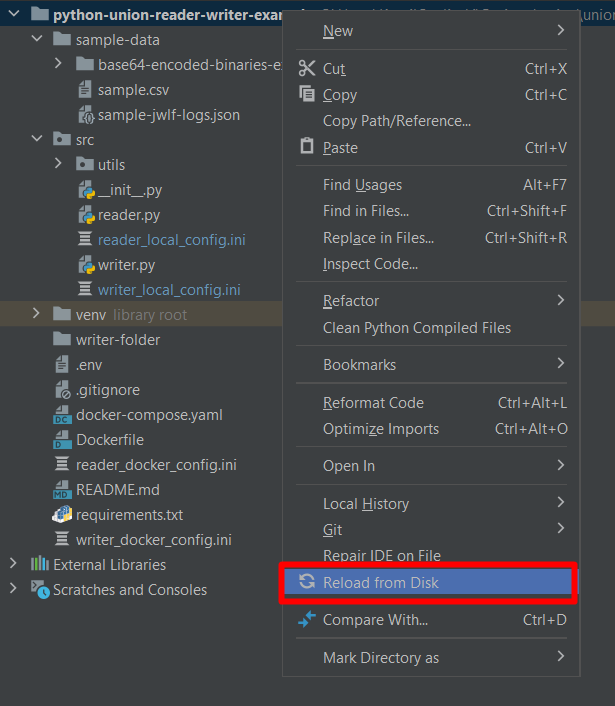
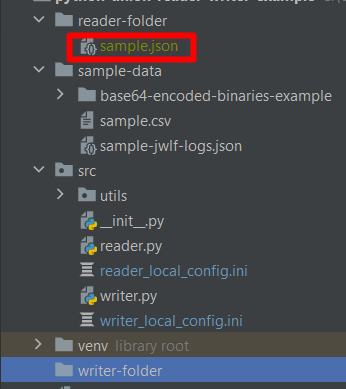
If the apps are running, writer-folder is supposed to get created. If it doesn’t show up in the left panel, please right click the parent folder and select the Reload from disk option.
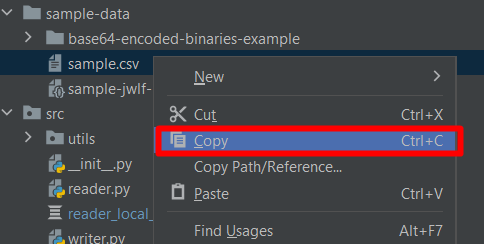
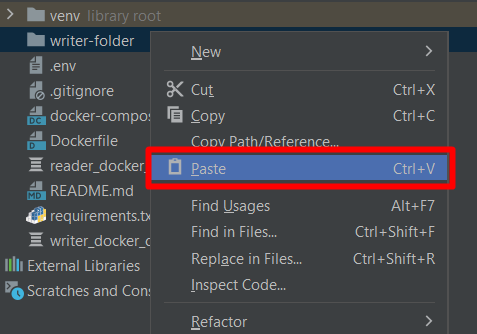
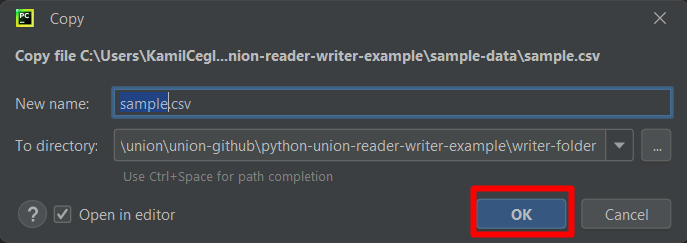
With both apps running and the writer-folder visible, let’s test data transfer to and from Union. To do this, copy a file or a folder from sample-data directory and paste it to writer-folder.
Immediately, writer.py will pick up the data and send it to Union. Once reader.py notices the newly added data, it will read it and save it in reader-folder.

With this, you have successfully written data to and read data from Union. Feel free to check out this example in other languages as detailed in the C# and Java versions of this tutorial.